HP 0x2x16 KVM Server Console Switch Maintenance and Service Guide - Page 66
Example of a Compaq Server Console Switch cascade configuration
 |
View all HP 0x2x16 manuals
Add to My Manuals
Save this manual to your list of manuals |
Page 66 highlights
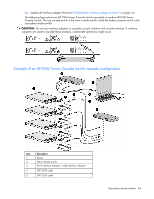
Example of a Compaq Server Console Switch cascade configuration Item Description 1 Server 2 KVM cable 3 PS/2 Interface Adapter 4 UTP CAT5 cable 5 Main Compaq Server Console Switch 6 Local port 7 Cascaded console switch Cascading an HP KVM Server Console Switch with an HP IP Console Switch NOTE: To perform a firmware upgrade for a cascaded HP KVM Server Console Switch and all attached interface adapters, you must locally connect the keyboard, monitor, and mouse to the cascaded HP KVM Server Console Switch to access the local OSD. 1. Mount the console switches in the rack. Cascading console switches 66
-
 1
1 -
2
-
3
-
4
-
5
-
6
-
7
-
8
-
9
-
10
-
11
-
12
-
13
-
14
-
15
-
16
-
17
-
18
-
19
-
20
-
21
-
22
-
23
-
24
-
25
-
26
-
27
-
28
-
29
-
30
-
31
-
32
-
33
-
34
-
35
-
36
-
37
-
38
-
39
-
40
-
41
-
42
-
43
-
44
-
45
-
46
-
47
-
48
-
49
-
50
-
51
-
52
-
53
-
54
-
55
-
56
-
57
-
58
-
59
-
60
-
 61
61 -
 62
62 -
 63
63 -
 64
64 -
 65
65 -
 66
66 -
 67
67 -
 68
68 -
 69
69 -
 70
70 -
 71
71 -
72
-
73
-
74
-
75
-
76
-
77
-
78
 |
 |

Cascading console switches 66
Example of a Compaq Server Console Switch cascade configuration
Item
Description
1
Server
2
KVM cable
3
PS/2 Interface Adapter
4
UTP CAT5 cable
5
Main Compaq Server Console Switch
6
Local port
7
Cascaded console switch
Cascading an HP KVM Server Console Switch with an HP
IP Console Switch
NOTE:
To perform a firmware upgrade for a cascaded HP KVM Server Console Switch and all attached
interface adapters, you must locally connect the keyboard, monitor, and mouse to the cascaded HP KVM
Server Console Switch to access the local OSD.
1.
Mount the console switches in the rack.