HP 1000 HP Photo Scanner 1000 - (English) Photo Printing Quick Reference Guide - Page 3
Adjusting Images - windows 7
 |
View all HP 1000 manuals
Add to My Manuals
Save this manual to your list of manuals |
Page 3 highlights
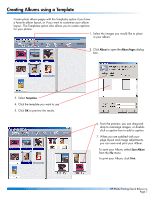
Adjusting Images In the Photo Gallery, click the magnifying glass or double-click the image to open the Image Adjustment window. Use the Rotate Clockwise and Rotate Counterclockwise buttons to rotate the image in the gallery. In the Image Adjustments window, use the crop handles to move the border of the photo and to select the part of the image you want to save. Use the Auto Adjust button to automatically adjust exposure and color at the same time. HP Photo Printing Quick Reference Page 3
-
 1
1 -
 2
2 -
 3
3 -
 4
4 -
 5
5 -
 6
6 -
 7
7
 |
 |

HP Photo Printing Quick Reference
Page 3
Adjusting Images
In the Photo Gallery, click
the magnifying glass or
double-click the image to
open the
Image Adjustment
window.
In the
Image Adjustments
window, use the crop handles to
move the border of the photo
and to select the part of the
image you want to save.
Use the
Auto Adjust
button to
automatically adjust exposure
and color at the same time.
Use the
Rotate Clockwise
and
Rotate Counterclockwise
buttons to rotate the image
in the gallery.