HP 1000 HP Photo Scanner 1000 - (English) Photo Printing Quick Reference Guide - Page 4
Using the Image Adjustment Tools - computer
 |
View all HP 1000 manuals
Add to My Manuals
Save this manual to your list of manuals |
Page 4 highlights
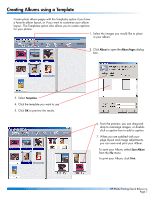
Using the Image Adjustment Tools If you are not using Auto Adjust, open a tool for adjusting exposure, color, sharpness, scaling, or rotation: • Show only the tools you need, and hide the rest. • Tools remember where they were when you last opened them. For example, open the color tool and the exposure tool. Use the eyedropper to select a point on the image that should be white (a highlight). Overall image color will be adjusted to make the selected point white. Use the Auto button to automatically adjust color. Use the Auto button to automatically adjust exposure. Use Reset to undo all changes for a tool, or use Undo in the Edit menu for more precise control over what functions you undo. HP Photo Printing Quick Reference Page 4
-
 1
1 -
 2
2 -
 3
3 -
 4
4 -
 5
5 -
 6
6 -
 7
7
 |
 |

HP Photo Printing Quick Reference
Page 4
Using the Image Adjustment Tools
If you are not using Auto Adjust,
open a tool for adjusting
exposure, color, sharpness,
scaling, or rotation:
•
Show only the tools you need,
and hide the rest.
•
Tools remember where they
were when you last opened
them.
Use the
Auto
button
to automatically
adjust exposure.
Use
Reset
to undo
all changes for a
tool, or use
Undo
in
the
Edit
menu for
more precise
control over what
functions you undo.
For example, open
the color tool and
the exposure tool.
Use the
eyedropper to
select a point on
the image that
should be white (a
highlight). Overall
image color will be
adjusted to make
the selected point
white.
Use the
Auto
button
to automatically
adjust color.