HP 10636 HP Ground Bonding Rack Option Kit Installation Guide - Page 4
Rack warning, Installing the ground bonding rack option kit on HP 10000 G2 Series Racks
 |
View all HP 10636 manuals
Add to My Manuals
Save this manual to your list of manuals |
Page 4 highlights
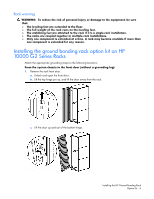
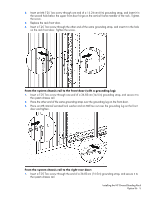
Rack warning WARNING: To reduce the risk of personal injury or damage to the equipment, be sure that: • The leveling feet are extended to the floor. • The full weight of the rack rests on the leveling feet. • The stabilizing feet are attached to the rack if it is a single-rack installation. • The racks are coupled together in multiple-rack installations. • Only one component is extended at a time. A rack may become unstable if more than one component is extended for any reason. Installing the ground bonding rack option kit on HP 10000 G2 Series Racks Attach the appropriate grounding straps to the following locations: From the system chassis to the front door (without a grounding lug): 1. Remove the rack front door. a. Unlock and open the front door. b. Lift the top hinge pin up, and tilt the door away from the rack. c. Lift the door up and out of the bottom hinge. Installing the HP Ground Bonding Rack Option Kit 4
-
 1
1 -
 2
2 -
 3
3 -
 4
4 -
 5
5 -
 6
6 -
 7
7 -
 8
8 -
 9
9 -
 10
10 -
11
-
12
-
13
-
14
-
15
-
16
-
17
-
18
-
19
 |
 |
