HP 10642 HP Ground Bonding Rack Option Kit Installation Guide - Page 13
Installing the ground bonding rack option kit on HP 10000 Series Racks
 |
View all HP 10642 manuals
Add to My Manuals
Save this manual to your list of manuals |
Page 13 highlights
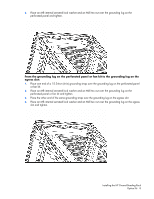
Installing the ground bonding rack option kit on HP 10000 Series Racks Attach the appropriate grounding straps to the following locations: From the system chassis rail to the front door: 1. Insert a T-25 Torx screw through one end of a 36.83-cm (14.5-in) grounding strap, and secure it to the system chassis rail. 2. Remove the inside front door panel screw. 3. Place an M5 Belleville toothed washer and the other end of the grounding strap over the front door panel screw. 4. Reinsert and tighten the front door panel screw. From the system chassis rail to the right rear door: 1. Insert a T-25 Torx screw through the end of a 36.83-cm (14.5-in) grounding strap, and secure it to the system chassis rail. 2. Place the other end of the same grounding strap over the grounding lug on the right rear door. Installing the HP Ground Bonding Rack Option Kit 13
-
 1
1 -
2
-
3
-
4
-
5
-
6
-
7
-
 8
8 -
 9
9 -
 10
10 -
 11
11 -
 12
12 -
 13
13 -
 14
14 -
 15
15 -
 16
16 -
 17
17 -
 18
18 -
19
 |
 |
