HP 10647 10842 Rack Reference Guide - Page 38
Using the Template, Match up the hole pattern indicated on the sides of the template with the hole
 |
View all HP 10647 manuals
Add to My Manuals
Save this manual to your list of manuals |
Page 38 highlights
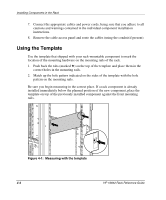
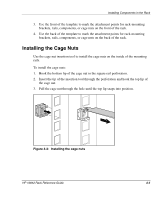
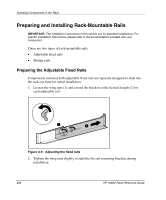
Installing Components in the Rack 7. Connect the appropriate cables and power cords, being sure that you adhere to all cautions and warnings contained in the individual component installation instructions. 8. Remove the cable access panel and route the cables (using the conduit if present). Using the Template Use the template that shipped with your rack-mountable component to mark the location of the mounting hardware on the mounting rails of the rack. 1. Push back the tabs (marked #) on the top of the template and place them in the correct holes in the mounting rails. 2. Match up the hole pattern indicated on the sides of the template with the hole pattern on the mounting rails. Be sure you begin measuring in the correct place. If a rack component is already installed immediately below the planned position of the new component, place the template on top of the previously installed component against the front mounting rails. Figure 4-1: Measuring with the template 4-4 HP 10842 Rack Reference Guide
-
 1
1 -
2
-
3
-
4
-
5
-
6
-
7
-
8
-
9
-
10
-
11
-
12
-
13
-
14
-
15
-
16
-
17
-
18
-
19
-
20
-
21
-
22
-
23
-
24
-
25
-
26
-
27
-
28
-
29
-
30
-
31
-
32
-
 33
33 -
 34
34 -
 35
35 -
 36
36 -
 37
37 -
 38
38 -
 39
39 -
 40
40 -
 41
41 -
 42
42 -
 43
43 -
44
-
45
-
46
-
47
-
48
-
49
-
50
-
51
-
52
-
53
-
54
-
55
-
56
-
57
-
58
-
59
-
60
-
61
-
62
-
63
-
64
-
65
-
66
-
67
-
68
-
69
-
70
 |
 |
