HP 10842 10842 Rack Reference Guide - Page 15
Delivery Considerations, Installation Sequence Summary, to the permanent site for your rack.
 |
View all HP 10842 manuals
Add to My Manuals
Save this manual to your list of manuals |
Page 15 highlights
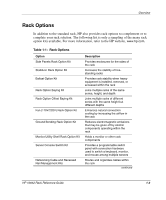
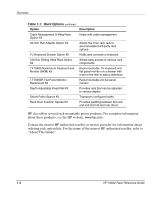
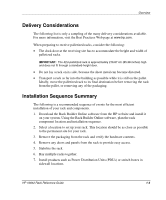
Overview Delivery Considerations The following list is only a sampling of the many delivery considerations available. For more information, visit the Best Practices Web page at www.hp.com. When preparing to receive palletized racks, consider the following: • The dock door at the receiving site has to accommodate the height and width of palletized racks. IMPORTANT: The 42U-palletized rack is approximately 216.87 cm (85.38 inches) high and does not fit through a standard-height door. • Do not lay a rack on its side, because the sheet metal can become distorted. • Transport a rack as far into the building as possible while it is still on the pallet. Ideally, move the palletized rack to its final destination before removing the rack from the pallet, or removing any of the packaging. Installation Sequence Summary The following is a recommended sequence of events for the most efficient installation of your rack and components. 1. Download the Rack Builder Online software from the HP website and install it on your system. Using the Rack Builder Online software, plan the rack component location and installation sequence. 2. Select a location to set up your rack. This location should be as close as possible to the permanent site for your rack. 3. Remove the packaging from the rack and verify the hardware contents. 4. Remove any doors and panels from the rack to provide easy access. 5. Stabilize the rack. 6. Bay multiple racks together. 7. Install products such as Power Distribution Units (PDUs) or switch boxes in sidewall locations. HP 10842 Rack Reference Guide 1-5
-
 1
1 -
2
-
3
-
4
-
5
-
6
-
7
-
8
-
9
-
 10
10 -
 11
11 -
 12
12 -
 13
13 -
 14
14 -
 15
15 -
 16
16 -
 17
17 -
 18
18 -
 19
19 -
 20
20 -
21
-
22
-
23
-
24
-
25
-
26
-
27
-
28
-
29
-
30
-
31
-
32
-
33
-
34
-
35
-
36
-
37
-
38
-
39
-
40
-
41
-
42
-
43
-
44
-
45
-
46
-
47
-
48
-
49
-
50
-
51
-
52
-
53
-
54
-
55
-
56
-
57
-
58
-
59
-
60
-
61
-
62
-
63
-
64
-
65
-
66
-
67
-
68
-
69
-
70
 |
 |