HP 11622 HP 11000 G2 Series Rack User Guide - Page 9
Removing the rack doors
 |
View all HP 11622 manuals
Add to My Manuals
Save this manual to your list of manuals |
Page 9 highlights
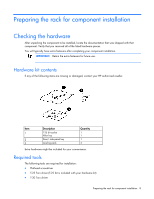
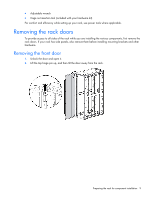
• Adjustable wrench • Cage nut insertion tool (included with your hardware kit) For comfort and efficiency while setting up your rack, use power tools where applicable. Removing the rack doors To provide access to all sides of the rack while you are installing the various components, first remove the rack doors. If your rack has side panels, also remove them before installing mounting brackets and other hardware. Removing the front door 1. Unlock the door and open it. 2. Lift the top hinge pin up, and then tilt the door away from the rack. Preparing the rack for component installation 9
-
 1
1 -
2
-
3
-
 4
4 -
 5
5 -
 6
6 -
 7
7 -
 8
8 -
 9
9 -
 10
10 -
 11
11 -
 12
12 -
 13
13 -
 14
14 -
15
-
16
-
17
-
18
-
19
-
20
-
21
-
22
-
23
-
24
-
25
-
26
-
27
 |
 |

Preparing the rack for component installation
9
•
Adjustable wrench
•
Cage nut insertion tool (included with your hardware kit)
For comfort and efficiency while setting up your rack, use power tools where applicable.
Removing the rack doors
To provide access to all sides of the rack while you are installing the various components, first remove the
rack doors. If your rack has side panels, also remove them before installing mounting brackets and other
hardware.
Removing the front door
1.
Unlock the door and open it.
2.
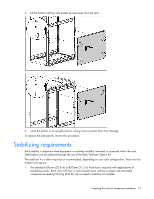
Lift the top hinge pin up, and then tilt the door away from the rack.