HP 3600n HP Color LaserJet 3000, 3600, 3800 Series Printers Getting Started Gu - Page 8
Manejo De Papel
 |
UPC - 829160888712
View all HP 3600n manuals
Add to My Manuals
Save this manual to your list of manuals |
Page 8 highlights
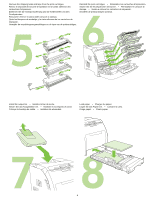
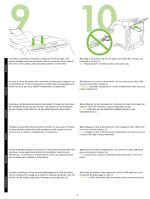
12 13 LAN English Français Deutsch Set the media size and type for the input trays. At the printer control panel, press MENU, use the or button to highlight PAPER HANDLING, and then press . Use the control panel buttons to highlight and select media sizes and types for each input tray. For more information, see the online user guide. To connect to a network, go to step 13 on page 9. Définition du format et du type de support pour les différents bacs d'alimentation. Sur le panneau de commande de l'imprimante, appuyez sur MENU, puis utilisez les touches et pour mettre GESTION DU PAPIER en surbrillance, puis appuyez sur . Utilisez les boutons du panneau de commande pour mettre en surbrillance et sélectionner le format et le type de support de chaque bac d'alimentation. Pour plus d'informations, consultez le guide de l'utilisateur en ligne. Pour vous connecter à un réseau, passez à l'étape 13, page 9. Legen Sie das Medienformat und den Medientyp für die Zufuhrfächer fest. Drücken Sie auf dem Bedienfeld des Druckers auf MENÜ. Verwenden Sie die Taste oder , um PAPIERZUFUHR zu markieren. Drücken Sie anschließend auf . Verwenden Sie die Bedienfeldtasten, um das Medienformat und den Medientyp für die einzelnen Zufuhrfächer zu markieren und auszuwählen. Weitere Informationen finden Sie im Online-Benutzerhandbuch. Wenn Sie den Drucker mit einem Netzwerk verbinden möchten, fahren Sie mit Schritt 13 auf Seite 9 fort. Impostare il formato e il tipo di supporto da utilizzare nei vassoi di alimentazione. Sul pannello di controllo della stampante, premere MENU, utilizzare il pulsante o per evidenziare GESTIONE CARTA, quindi premere . Utilizzare i pulsanti del pannello di controllo per evidenziare e selezionare i formati e i tipi di supporto da utilizzare in ciascun vassoio di alimentazione. Per ulteriori informazioni, consultare la guida dell'utente in linea. Per collegarsi a una rete, andare al punto 13 a pagina 9. Establezca el tamaño y el tipo de papel de las bandejas de entrada. En el panel de control de la impresora, pulse MENÚ, utilice los botones o para resaltar MANEJO DE PAPEL y, a continuación, pulse . Utilice los botones del panel de control para resaltar y seleccionar los tamaños y tipos de papel de cada bandeja de entrada. Para obtener más información, consulte la guía del usuario en línea. Para conectar la impresora a una red, vaya al paso 13 en la página 9. Stel het formaat en de soort afdrukmateriaal in voor de invoerladen. In het bedieningspaneel van de printer drukt u achtereenvolgens op MENU, gebruikt u de knop of om PAPIERVERWERKING te markeren en drukt u op . Gebruik de knoppen van het bedieningspaneel om het formaat en de soort afdrukmateriaal te markeren en te selecteren voor elke invoerlade. Voor meer informatie raadpleegt u de online gebruikershandleiding. Ga naar stap 13 op pagina 9 als u verbinding wilt maken met een netwerk. 7 Italiano Español Nederlands
-
 1
1 -
2
-
 3
3 -
 4
4 -
 5
5 -
 6
6 -
 7
7 -
 8
8 -
 9
9 -
 10
10 -
 11
11 -
 12
12 -
 13
13 -
14
-
15
-
16
-
17
-
18
-
19
-
20
-
21
-
22
-
23
-
24
-
25
-
26
-
27
-
28
-
29
-
30
-
31
-
32
-
33
-
34
-
35
-
36
 |
 |
