HP 4300n HP LaserJet 4200 and 4300 series printer - User Guide - Page 101
Clearing jams from the optional envelope feeder
 |
UPC - 808736314381
View all HP 4300n manuals
Add to My Manuals
Save this manual to your list of manuals |
Page 101 highlights
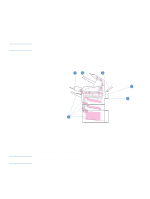
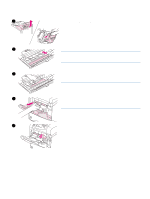
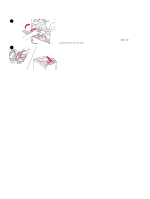
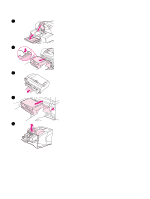
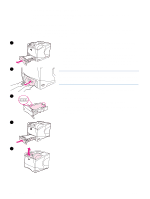
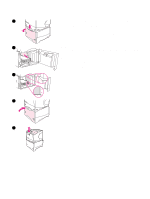
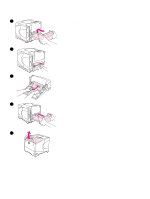
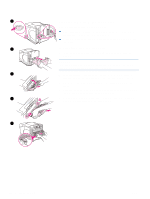
1 Clearing jams from the optional envelope feeder This section applies only to jams that occur when you are using an optional envelope feeder. To clear jams from the optional envelope feeder 1 Remove any envelopes loaded in the optional envelope feeder. 2 Lower the envelope weight and lift the tray extension up to the closed position. 2 Press and hold the release button on the left side of the optional envelope feeder. Grasp both sides of the optional envelope feeder and carefully pull it out of the printer. 3 Slowly remove any envelopes from the optional envelope feeder and the printer. 3 4 Insert the optional envelope feeder into the printer until it locks into place. (The connector on the top right side of the optional envelope feeder fits into the plug in the printer.) Pull gently on the optional envelope feeder to be sure that it is securely in place. 5 Open and close the top cover to clear the jam message. 6 If a jam message persists, there is still a jammed envelope in the printer. Look for the jam in another location. (See "Jam locations" on 4 page 96.) 7 Reload envelopes, making sure that you push the bottom envelopes in slightly further than the top envelopes. (See "Loading envelopes in the optional envelope feeder" on page 56.) 5 ENWW Clearing jams 99
-
 1
1 -
2
-
3
-
4
-
5
-
6
-
7
-
8
-
9
-
10
-
11
-
12
-
13
-
14
-
15
-
16
-
17
-
18
-
19
-
20
-
21
-
22
-
23
-
24
-
25
-
26
-
27
-
28
-
29
-
30
-
31
-
32
-
33
-
34
-
35
-
36
-
37
-
38
-
39
-
40
-
41
-
42
-
43
-
44
-
45
-
46
-
47
-
48
-
49
-
50
-
51
-
52
-
53
-
54
-
55
-
56
-
57
-
58
-
59
-
60
-
61
-
62
-
63
-
64
-
65
-
66
-
67
-
68
-
69
-
70
-
71
-
72
-
73
-
74
-
75
-
76
-
77
-
78
-
79
-
80
-
81
-
82
-
83
-
84
-
85
-
86
-
87
-
88
-
89
-
90
-
91
-
92
-
93
-
94
-
95
-
 96
96 -
 97
97 -
 98
98 -
 99
99 -
 100
100 -
 101
101 -
 102
102 -
 103
103 -
 104
104 -
 105
105 -
 106
106 -
107
-
108
-
109
-
110
-
111
-
112
-
113
-
114
-
115
-
116
-
117
-
118
-
119
-
120
-
121
-
122
-
123
-
124
-
125
-
126
-
127
-
128
-
129
-
130
-
131
-
132
-
133
-
134
-
135
-
136
-
137
-
138
-
139
-
140
-
141
-
142
-
143
-
144
-
145
-
146
-
147
-
148
-
149
-
150
-
151
-
152
-
153
-
154
-
155
-
156
-
157
-
158
-
159
-
160
-
161
-
162
-
163
-
164
-
165
-
166
-
167
-
168
-
169
-
170
-
171
-
172
-
173
-
174
-
175
-
176
-
177
-
178
-
179
-
180
-
181
-
182
-
183
-
184
-
185
-
186
-
187
-
188
-
189
-
190
-
191
-
192
-
193
-
194
-
195
-
196
-
197
-
198
-
199
-
200
-
201
-
202
-
203
-
204
-
205
-
206
-
207
-
208
-
209
-
210
-
211
-
212
-
213
-
214
-
215
-
216
-
217
-
218
 |
 |
