HP 450c HP DesignJet 430, 450C, and 455CA Printer - User's Guide - Page 128
light flashes three times.
 |
View all HP 450c manuals
Add to My Manuals
Save this manual to your list of manuals |
Page 128 highlights
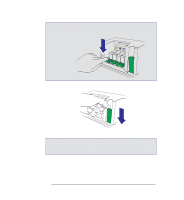
Maintaining your printer Replacing cartridges 450C/ 455CA 3 Match the color of the cartridge's label with the color of the dot above the empty stall. For users with color-vision deficiencies: you can identify the colors of the cartridges by the part numbers on the boxes-see page 10-18. a Take the new cartridge out of its box. b Remove the colored protective tape and tab from the cartridge's nozzles. c Make sure that the printer is still switched on. Never install cartridges with the printer switched off. d Insert the new cartridge in the stall. Press down lightly and push the cartridge away from you until it snaps into place. If it is installed correctly, the Ready light flashes three times. Yellow Cyan Magenta Black 2 1 2 1 430 4 When you have finished replacing cartridges, lower the cover. 450C 455CA If you wish, you can now check your cartridge alignment by running the Black Cartridge Alignment Routine (see page 5-4). However, this is normally only required for troubleshooting. 7-6
-
 1
1 -
2
-
3
-
4
-
5
-
6
-
7
-
8
-
9
-
10
-
11
-
12
-
13
-
14
-
15
-
16
-
17
-
18
-
19
-
20
-
21
-
22
-
23
-
24
-
25
-
26
-
27
-
28
-
29
-
30
-
31
-
32
-
33
-
34
-
35
-
36
-
37
-
38
-
39
-
40
-
41
-
42
-
43
-
44
-
45
-
46
-
47
-
48
-
49
-
50
-
51
-
52
-
53
-
54
-
55
-
56
-
57
-
58
-
59
-
60
-
61
-
62
-
63
-
64
-
65
-
66
-
67
-
68
-
69
-
70
-
71
-
72
-
73
-
74
-
75
-
76
-
77
-
78
-
79
-
80
-
81
-
82
-
83
-
84
-
85
-
86
-
87
-
88
-
89
-
90
-
91
-
92
-
93
-
94
-
95
-
96
-
97
-
98
-
99
-
100
-
101
-
102
-
103
-
104
-
105
-
106
-
107
-
108
-
109
-
110
-
111
-
112
-
113
-
114
-
115
-
116
-
117
-
118
-
119
-
120
-
121
-
122
-
 123
123 -
 124
124 -
 125
125 -
 126
126 -
 127
127 -
 128
128 -
 129
129 -
 130
130 -
 131
131 -
 132
132 -
 133
133 -
134
-
135
-
136
-
137
-
138
-
139
-
140
-
141
-
142
-
143
-
144
-
145
-
146
-
147
-
148
-
149
-
150
-
151
-
152
-
153
-
154
-
155
-
156
-
157
-
158
-
159
-
160
-
161
-
162
-
163
-
164
-
165
-
166
-
167
-
168
-
169
-
170
-
171
-
172
-
173
-
174
-
175
-
176
-
177
-
178
-
179
-
180
-
181
-
182
-
183
-
184
-
185
-
186
-
187
-
188
-
189
-
190
-
191
-
192
-
193
-
194
-
195
-
196
 |
 |
