HP 4550 HP Color LaserJet 4550 printer family - Software Technical Reference - Page 104
Install Printer
 |
View all HP 4550 manuals
Add to My Manuals
Save this manual to your list of manuals |
Page 104 highlights
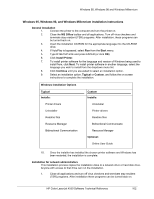
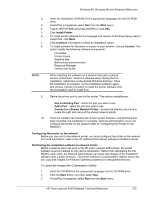
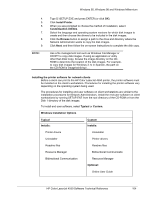
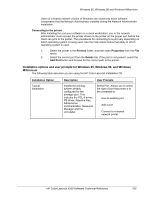
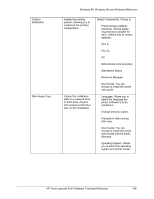
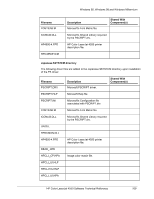
Windows 95, Windows 98 and Windows Millennium 4. 5. 6. 7. 8. 9. NOTE: Type D:\SETUP.EXE and press ENTER (or click OK). Click Install Printer. When you are prompted to choose the method of installation, select Customization Utilities. Select the language and operating system versions for which disk images to create and then choose the drivers to be included in the disk images. Click the Browse button to assign a path to the drive and directory where the Network Administrator wants to copy the disk images. Click Next, and then follow the on-screen instructions to complete the disk copy. Use a file management tool such as Windows File Manager or XCOPY to copy disk images. If using an application or utility other than Disk Copy, browse the image directory on the CDROM to determine the location of the disk images. For example, to copy disk images for Windows 3.1x in Spanish, the path on the CD-ROM is \image\win3x\sp\.... Installing the printer software for network clients Before a client can print to the HP Color LaserJet 4550 printer, the printer software must be installed on the client's workstation. Procedures for installing the printer software vary depending on the operating system being used. The procedures for installing end-user software on client workstations are similar to the installation procedures for Network Administrators. Install the end-user software on client workstations by running SETUP.EXE from the root directory of the CD-ROM or from the Disk 1 directory of the disk images. To install end-user software, select Typical or Custom. Windows Installation Options Typical Installs: Custom Installs: • Printer drivers • Uninstaller • Readme files • Resource Manager • Bidirectional Communication • Uninstaller • Printer drivers • Readme files • Bidirectional Communicatio • Resource Manager Optional: • Online User Guide HP Color LaserJet 4550 Software Technical Reference 104
-
 1
1 -
2
-
3
-
4
-
5
-
6
-
7
-
8
-
9
-
10
-
11
-
12
-
13
-
14
-
15
-
16
-
17
-
18
-
19
-
20
-
21
-
22
-
23
-
24
-
25
-
26
-
27
-
28
-
29
-
30
-
31
-
32
-
33
-
34
-
35
-
36
-
37
-
38
-
39
-
40
-
41
-
42
-
43
-
44
-
45
-
46
-
47
-
48
-
49
-
50
-
51
-
52
-
53
-
54
-
55
-
56
-
57
-
58
-
59
-
60
-
61
-
62
-
63
-
64
-
65
-
66
-
67
-
68
-
69
-
70
-
71
-
72
-
73
-
74
-
75
-
76
-
77
-
78
-
79
-
80
-
81
-
82
-
83
-
84
-
85
-
86
-
87
-
88
-
89
-
90
-
91
-
92
-
93
-
94
-
95
-
96
-
97
-
98
-
 99
99 -
 100
100 -
 101
101 -
 102
102 -
 103
103 -
 104
104 -
 105
105 -
 106
106 -
 107
107 -
 108
108 -
 109
109 -
110
-
111
-
112
-
113
-
114
-
115
-
116
-
117
-
118
-
119
-
120
-
121
-
122
-
123
-
124
-
125
-
126
-
127
-
128
-
129
-
130
-
131
-
132
-
133
-
134
-
135
-
136
-
137
-
138
-
139
-
140
-
141
-
142
-
143
-
144
-
145
-
146
-
147
-
148
-
149
-
150
-
151
-
152
-
153
-
154
-
155
-
156
-
157
-
158
-
159
-
160
-
161
-
162
-
163
-
164
-
165
-
166
-
167
-
168
-
169
-
170
-
171
-
172
-
173
-
174
-
175
-
176
-
177
-
178
-
179
-
180
-
181
-
182
-
183
-
184
-
185
-
186
-
187
-
188
-
189
-
190
-
191
-
192
-
193
-
194
-
195
-
196
-
197
-
198
-
199
-
200
-
201
-
202
-
203
-
204
-
205
-
206
-
207
-
208
-
209
-
210
-
211
-
212
-
213
-
214
-
215
-
216
-
217
-
218
-
219
-
220
-
221
-
222
-
223
-
224
-
225
-
226
-
227
-
228
-
229
-
230
-
231
-
232
-
233
-
234
-
235
-
236
-
237
-
238
-
239
-
240
-
241
 |
 |