HP 50g HP 50g_user's manual_English_HDPSG49AEM8.pdf - Page 170
Inserting and removing an SD card, Formatting an SD card
 |
UPC - 882780502291
View all HP 50g manuals
Add to My Manuals
Save this manual to your list of manuals |
Page 170 highlights
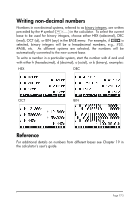
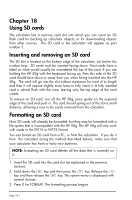
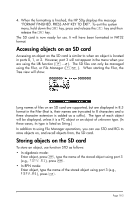
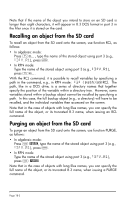
Chapter 18 Using SD cards The calculator has a memory card slot into which you can insert an SD flash card for backing up calculator objects, or for downloading objects from other sources. The SD card in the calculator will appear as port number 3. Inserting and removing an SD card The SD slot is located on the bottom edge of the calculator, just below the number keys. SD cards must be inserted facing down. Most cards have a label on what would usually be considered the top of the card. If you are holding the HP 50g with the keyboard facing up, then this side of the SD card should face down or away from you when being inserted into the HP 50g. The card will go into the slot without resistance for most of its length and then it will require slightly more force to fully insert it. A fully inserted card is almost flush with the case, leaving only the top edge of the card visible. To remove an SD card, turn off the HP 50g, press gently on the exposed edge of the card and push in. The card should spring out of the slot a small distance, allowing it now to be easily removed from the calculator. Formatting an SD card Most SD cards will already be formatted, but they may be formatted with a file system that is incompatible with the HP 50g. The HP 50g will only work with cards in the FAT16 or FAT32 format. You can format an SD card from a PC, or from the calculator. If you do it from the calculator (using the method described below), make sure that your calculator has fresh or fairly new batteries. NOTE: formatting an SD card deletes all the data that is currently on it. 1. Insert the SD card into the card slot (as explained in the previous section). 2. Hold down the ‡ key and then press the D key. Release the D key and then release the ‡ key. The system menu is displayed with several choices. 3. Press 0 for FORMAT. The formatting process begins. Page 18-1
-
 1
1 -
2
-
3
-
4
-
5
-
6
-
7
-
8
-
9
-
10
-
11
-
12
-
13
-
14
-
15
-
16
-
17
-
18
-
19
-
20
-
21
-
22
-
23
-
24
-
25
-
26
-
27
-
28
-
29
-
30
-
31
-
32
-
33
-
34
-
35
-
36
-
37
-
38
-
39
-
40
-
41
-
42
-
43
-
44
-
45
-
46
-
47
-
48
-
49
-
50
-
51
-
52
-
53
-
54
-
55
-
56
-
57
-
58
-
59
-
60
-
61
-
62
-
63
-
64
-
65
-
66
-
67
-
68
-
69
-
70
-
71
-
72
-
73
-
74
-
75
-
76
-
77
-
78
-
79
-
80
-
81
-
82
-
83
-
84
-
85
-
86
-
87
-
88
-
89
-
90
-
91
-
92
-
93
-
94
-
95
-
96
-
97
-
98
-
99
-
100
-
101
-
102
-
103
-
104
-
105
-
106
-
107
-
108
-
109
-
110
-
111
-
112
-
113
-
114
-
115
-
116
-
117
-
118
-
119
-
120
-
121
-
122
-
123
-
124
-
125
-
126
-
127
-
128
-
129
-
130
-
131
-
132
-
133
-
134
-
135
-
136
-
137
-
138
-
139
-
140
-
141
-
142
-
143
-
144
-
145
-
146
-
147
-
148
-
149
-
150
-
151
-
152
-
153
-
154
-
155
-
156
-
157
-
158
-
159
-
160
-
161
-
162
-
163
-
164
-
 165
165 -
 166
166 -
 167
167 -
 168
168 -
 169
169 -
 170
170 -
 171
171 -
 172
172 -
 173
173 -
 174
174 -
 175
175 -
176
-
177
-
178
-
179
-
180
-
181
-
182
-
183
-
184
 |
 |