HP 5100tn HP LaserJet 5100 Series - Duplexer Installation Guide - Page 5
Zasuňte zadní část
 |
View all HP 5100tn manuals
Add to My Manuals
Save this manual to your list of manuals |
Page 5 highlights
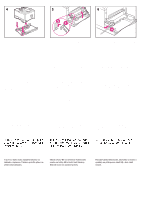
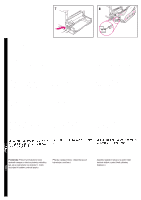
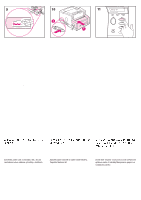
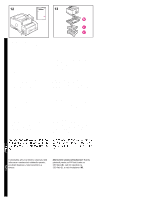
Lift and rotate the rear section to clear all of the tabs in the grooves. Slide the rear section (I) into the back of the printer. Switch the printer on (J). Select "Duplex" printing either from your software application or from the Paper Handling menu in the control panel. Soulevez et faites pivoter la section arrière pour enlever toutes les languettes des rainures. Introduisez la section arrière (I) dans l'arrière de l'imprimante en la faisant glisser. Mettez l'imprimante sous tension (J). Sélectionnez l'option d'impression recto-verso de votre application logicielle ou du menu Traitement papier proposé par le panneau de commande. Heben Sie das Duplexer-Rückteil an, und drehen Sie es so, daß die Stifte über alle Erhöhungen in den Führungsnuten geführt werden. Schieben Sie das Rückteil (I) in die Rückseite des Druckers. Schalten Sie den Drucker ein (J). Wählen Sie die Option "Duplexdruck" entweder über die Software oder über das Papierzuführungsmenü im Bedienfeld. Sollevare e ruotare la sezione posteriore per liberare tutte le linguette nelle guide. Inserire la sezione posteriore (I) nel retro della stampante. Accendere la stampante (J). Selezionare la stampa "Duplex" nell'applicazione software o nel menu Gestione carta del pannello di controllo. Levante y gire la sección posterior para pasar todas las lengüetas en las ranuras. Inserte la sección posterior (I) en la parte posterior de la impresora. Encienda la impresora (J). Seleccione la impresión "dúplex" desde su software de aplicación o desde el menú de manejo del papel, en el panel de control. Zvedněte zadní část a otáčejte jí tak, aby se nacházela mimo veškeré výčnělky v drážkách. Zasuňte zadní část (I) do zádní části tiskárny. Zapněte tiskárnu (J). Zvolte tisk "Duplex" buď pomocí své softwarové aplikace nebo z nabídky Manipulace papíru na ovládacím panelu.
-
 1
1 -
 2
2 -
 3
3 -
 4
4 -
 5
5 -
 6
6 -
 7
7 -
 8
8 -
 9
9 -
 10
10 -
 11
11 -
12
-
13
-
14
-
15
-
16
-
17
-
18
-
19
-
20
-
21
-
22
-
23
-
24
 |
 |
