HP 9250c HP 9250C Digital Sender - Getting Started Guide (multiple language) - Page 4
Device components - control panel
 |
UPC - 882780801028
View all HP 9250c manuals
Add to My Manuals
Save this manual to your list of manuals |
Page 4 highlights
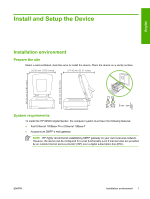
English Device components Unpack the device Remove all shipping bags, tape, and packing material. 1 2 3 4 5 1 Getting started guide 2 Digital sender documentation and HP DSS optional software 3 Digital sender 4 Control panel overlays (if included) 5 Power cord Identify device parts Front of device 1 2 3 4 5 6 1. Control panel 2. Jam release 3. Output bin 4. ADF input tray 5. Keyboard (pull to open) 6. On/off switch 2 Install and Setup the Device ENWW
-
 1
1 -
 2
2 -
 3
3 -
 4
4 -
 5
5 -
 6
6 -
 7
7 -
 8
8 -
 9
9 -
 10
10 -
11
-
12
-
13
-
14
-
15
-
16
-
17
-
18
-
19
-
20
-
21
-
22
-
23
-
24
-
25
-
26
-
27
-
28
-
29
-
30
-
31
-
32
-
33
-
34
-
35
-
36
-
37
-
38
-
39
-
40
-
41
-
42
-
43
-
44
-
45
-
46
-
47
-
48
-
49
-
50
-
51
-
52
 |
 |

Device components
Unpack the device
Remove all shipping bags, tape, and packing material.
1
2
4
3
5
1
Getting started guide
2
Digital sender documentation and HP DSS optional software
3
Digital sender
4
Control panel overlays (if included)
5
Power cord
Identify device parts
Front of device
5
6
3
4
2
1
1. Control panel
2. Jam release
3. Output bin
4. ADF input tray
5. Keyboard (pull to open)
6. On/off switch
2
Install and Setup the Device
ENWW
English