HP 9250c HP 9250C Digital Sender - Getting Started Guide (multiple language) - Page 7
Con the control-panel settings - digital sender manual
 |
UPC - 882780801028
View all HP 9250c manuals
Add to My Manuals
Save this manual to your list of manuals |
Page 7 highlights
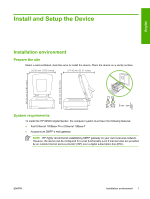
Connect the power cord English 2 1 1. Connect the power cord to the device and outlet. 2. Turn on the power switch and follow the prompts on the control panel. Configure the control-panel settings Basic default settings Language settings After the device warms up, the messages on the control panel appear in English. Change the language in one of two ways: ● Select the preferred language from the Language menu the first time the device is turned on. The language must be selected within 60 seconds after the menu appears. or ● Change the language at any time from the Administration menu. First touch Device Behavior, touch Language, touch the preferred language, and then touch Save. Date and time settings Touch Exit if the date and time settings are correct. Touch OK to change these settings. Assign the IP address The device must be assigned a valid IP (Internet Protocol) address on the network. If the network uses dynamic host configuration protocol (DHCP), the IP address can be assigned automatically. DHCP is the default setting in the digital sender. Manually assign an IP address if DHCP is not being used. Find the automatically assigned DHCP IP address On the home screen, touch Network Address. The IP address appears on the Network Address screen. If the Network Address button does not appear, find the IP address: ● Touch Administration, and then touch Information. ● Touch Configuration/Status Pages, and then touch Configuration Page. ● Touch Show. The digital-sender configuration information appears. ● Touch OK to see the Jetdirect data. Scroll through the information to find the IP address. ENWW Configure the control-panel settings 5
-
 1
1 -
 2
2 -
 3
3 -
 4
4 -
 5
5 -
 6
6 -
 7
7 -
 8
8 -
 9
9 -
 10
10 -
 11
11 -
 12
12 -
13
-
14
-
15
-
16
-
17
-
18
-
19
-
20
-
21
-
22
-
23
-
24
-
25
-
26
-
27
-
28
-
29
-
30
-
31
-
32
-
33
-
34
-
35
-
36
-
37
-
38
-
39
-
40
-
41
-
42
-
43
-
44
-
45
-
46
-
47
-
48
-
49
-
50
-
51
-
52
 |
 |