HP Brio 85xx hp brio 85xx, online reference guide - Page 42
now starts without any problems, there may be a problem with the new memory.
 |
View all HP Brio 85xx manuals
Add to My Manuals
Save this manual to your list of manuals |
Page 42 highlights
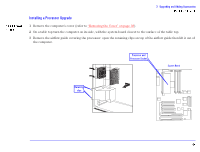
3 Upgrading and Adding Accessories 6 Install any other accessories before returning the computer to the upright position, replacing the cover, and reconnecting the power supply cords and any telecommunications cables. 7 Turn on the display, and then turn on the computer. 8 In Windows, check that the new memory has been recognized. To do this, right-click the My Computer icon on the desktop, then click Properties in the drop-down menu. If the new memory is not recognized, check that you have correctly followed the installation procedure described above. If there are any errors reported during the computer's startup routine, press to view the error(s) and take any necessary action. If you have any doubts about using the HP Setup program, contact your reseller for help. If you cannot start your computer properly, remove the memory and try starting your computer again. If the computer now starts without any problems, there may be a problem with the new memory. If you experience any other problems as a result of the upgrade, and your computer is supplied with the HP Brio Center, refer to the support tools for further assistance. If you need to remove a main memory module, release the retaining clips at both ends of the socket. This raises the module out of the socket. Handle the memory module by its edges, then lift it up and clear of the system board. Release the retaining clips
-
 1
1 -
2
-
3
-
4
-
5
-
6
-
7
-
8
-
9
-
10
-
11
-
12
-
13
-
14
-
15
-
16
-
17
-
18
-
19
-
20
-
21
-
22
-
23
-
24
-
25
-
26
-
27
-
28
-
29
-
30
-
31
-
32
-
33
-
34
-
35
-
36
-
 37
37 -
 38
38 -
 39
39 -
 40
40 -
 41
41 -
 42
42 -
 43
43 -
 44
44 -
 45
45 -
 46
46 -
 47
47 -
48
-
49
-
50
-
51
-
52
-
53
-
54
-
55
-
56
-
57
-
58
-
59
-
60
-
61
-
62
-
63
-
64
-
65
-
66
-
67
-
68
-
69
-
70
-
71
-
72
-
73
-
74
-
75
-
76
-
77
-
78
-
79
-
80
-
81
-
82
 |
 |
