HP Brio 85xx hp brio 85xx, online reference guide - Page 49
Installing an Expansion Card
 |
View all HP Brio 85xx manuals
Add to My Manuals
Save this manual to your list of manuals |
Page 49 highlights
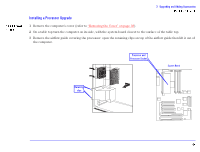
3 Upgrading and Adding Accessories Installing an Expansion Card Caution Static electricity can damage electronic components. Turn off all equipment. Don't let your clothes touch the accessory. To equalize the static electricity, rest the accessory bag on top of the computer while you are removing the accessory from the bag. Handle the accessory as little as possible and with care. 1 Remove the computer's cover (refer to "Removing the Cover" on page 38). 2 On a table top turn the computer on to its side, with the system board closest to the surface of the table top. 3 Find a free expansion card slot with the correct type of connector (PCI or ISA). Some cards may have preferred locations, in which case special installation instructions should be detailed in their manuals. 4 Each slot has a faceplate which is located inside the back of the computer. Remove the faceplate for the slot that you are installing an expansion card in. If it is tight, loosen the screws on the adjacent slots. Save the retaining screw(s). Note Some models may be provided with a faceplate that has to be removed with a screwdriver. To do this, insert a flathead screwdriver into the slot on the faceplate, then push forward until it snaps off. 5 Handle the card horizontally by its "top" edge with the card's connector pointing towards the slot's connector. Do not bend the card. Carefully slide the card into the slot and firmly press it into place. Ensure that the card's connector engages completely with the slot's connector and does not touch components on other cards. 6 Secure the card with the retaining screw. If you loosened the screws on adjacent faceplates, remember to tighten them. 7 Install any other accessories before returning the computer to the upright position, replacing the cover and reconnecting the power cords and any telecommunications cables. Turn on the display, and then turn on the computer. 8 If you have just installed a Plug and Play expansion card, Windows is able to recognize and configure the card automatically. The New Hardware Found dialog box is displayed while Windows loads the necessary driver(s).
-
 1
1 -
2
-
3
-
4
-
5
-
6
-
7
-
8
-
9
-
10
-
11
-
12
-
13
-
14
-
15
-
16
-
17
-
18
-
19
-
20
-
21
-
22
-
23
-
24
-
25
-
26
-
27
-
28
-
29
-
30
-
31
-
32
-
33
-
34
-
35
-
36
-
37
-
38
-
39
-
40
-
41
-
42
-
43
-
 44
44 -
 45
45 -
 46
46 -
 47
47 -
 48
48 -
 49
49 -
 50
50 -
 51
51 -
 52
52 -
 53
53 -
 54
54 -
55
-
56
-
57
-
58
-
59
-
60
-
61
-
62
-
63
-
64
-
65
-
66
-
67
-
68
-
69
-
70
-
71
-
72
-
73
-
74
-
75
-
76
-
77
-
78
-
79
-
80
-
81
-
82
 |
 |
