HP C5313AR HP OfficeJet 600 Series All-in-One - (English) User Guide - Page 15
Connect Your Office, Equipment
 |
View all HP C5313AR manuals
Add to My Manuals
Save this manual to your list of manuals |
Page 15 highlights
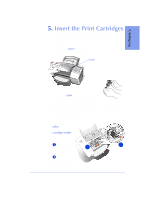
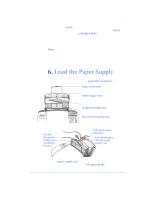
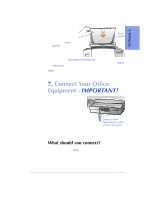
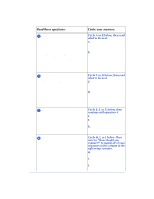
1. Setting Up q Load about a 1/2-inch- thick stack of 20-lb paper into the paper supply tray. Make sure the stack of paper fits behind the stack guides on the lower part of the tray. Load OJ-14loadpa paper with the print side facing toward you. Stack guides q Push the front document loading tray backward until it rests against the paper supply tray. You may want to pull up the paper extension to support the paper. Note: See Chapter 6 for detailed instructions on loading envelopes and other special paper/media types. 7. Connect Your Office Equipment - IMPORTANT! When you were installing the fax/ phone line connector in Step 2, you may have noticed the two ports on the back of the connector labeled, "To Phone, Answering Machine, or Modem." This means that you can use either one of these ports to connect any of these three types of devices you have in your office; the two ports are interchangeable. Connect other equipment to either of these two ports Remove the plugs from the two ports. Then refer to the following instructions to connect your other equipment. What should you connect? Based on your specific equipment and the number of telephone lines you have, there is only ONE optimum way to connect. Please read the questions in the following table, circle your answers, then look up the appropriate setup scenario in the following "How should you connect?" section. 1-7
-
 1
1 -
2
-
3
-
4
-
5
-
6
-
7
-
8
-
9
-
 10
10 -
 11
11 -
 12
12 -
 13
13 -
 14
14 -
 15
15 -
 16
16 -
 17
17 -
 18
18 -
 19
19 -
 20
20 -
21
-
22
-
23
-
24
-
25
-
26
-
27
-
28
-
29
-
30
-
31
-
32
-
33
-
34
-
35
-
36
-
37
-
38
-
39
-
40
-
41
-
42
-
43
-
44
-
45
-
46
-
47
-
48
-
49
-
50
-
51
-
52
-
53
-
54
-
55
-
56
-
57
-
58
-
59
-
60
-
61
-
62
-
63
-
64
-
65
-
66
-
67
-
68
-
69
-
70
-
71
-
72
-
73
-
74
-
75
-
76
-
77
-
78
-
79
-
80
-
81
-
82
-
83
-
84
-
85
-
86
-
87
-
88
-
89
-
90
-
91
-
92
-
93
-
94
-
95
-
96
-
97
-
98
-
99
-
100
-
101
-
102
-
103
-
104
-
105
-
106
-
107
-
108
-
109
-
110
-
111
-
112
-
113
-
114
-
115
-
116
-
117
-
118
-
119
-
120
-
121
-
122
-
123
-
124
-
125
-
126
-
127
-
128
-
129
-
130
-
131
-
132
-
133
-
134
-
135
-
136
-
137
-
138
-
139
-
140
 |
 |
