HP DesignJet Z5600 User guide - Page 97
Using clip contents by margins, Print a presentation
 |
View all HP DesignJet Z5600 manuals
Add to My Manuals
Save this manual to your list of manuals |
Page 97 highlights
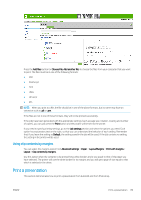
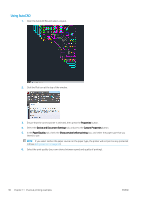
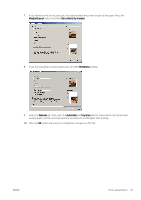
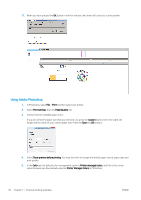
Press the Add files button (or Choose File, Add another file) to choose the files from your computer that you want to print. The files must be in one of the following formats: ● PDF ● PostScript ● TIFF ● JPEG ● HP-GL/2 ● RTL NOTE: When you print to a file, the file should be in one of the above formats, but its name may have an extension such as .plt or .prn. If the files are not in one of these formats, they will not be printed successfully. If the jobs have been generated with the appropriate settings (such as page size, rotation, resizing and number of copies), you can just press the Print button and the project will be sent to the printer. If you need to specify printing settings, go to the Job settings section and select the options you need. Each option has explanatory text on the right, so that you can understand the behavior of each setting. Remember that, if you leave the setting as Default, the setting saved in the job will be used. If the job contains no setting, the setting in the printer will be used. Using clip contents by margins You can select this margins option from Advanced settings > Paper > Layout/Margins > Print with margins > Layout > Clip contents by margins. Use this option when the contents to be printed have white borders and a size equal to that of the paper you have selected. The printer will use the white border for its margins and you will get a page of size equal to that which is selected in the driver. Print a presentation This section demonstrates how to print a presentation from AutoCAD and from Photoshop. ENWW Print a presentation 89
-
 1
1 -
2
-
3
-
4
-
5
-
6
-
7
-
8
-
9
-
10
-
11
-
12
-
13
-
14
-
15
-
16
-
17
-
18
-
19
-
20
-
21
-
22
-
23
-
24
-
25
-
26
-
27
-
28
-
29
-
30
-
31
-
32
-
33
-
34
-
35
-
36
-
37
-
38
-
39
-
40
-
41
-
42
-
43
-
44
-
45
-
46
-
47
-
48
-
49
-
50
-
51
-
52
-
53
-
54
-
55
-
56
-
57
-
58
-
59
-
60
-
61
-
62
-
63
-
64
-
65
-
66
-
67
-
68
-
69
-
70
-
71
-
72
-
73
-
74
-
75
-
76
-
77
-
78
-
79
-
80
-
81
-
82
-
83
-
84
-
85
-
86
-
87
-
88
-
89
-
90
-
91
-
 92
92 -
 93
93 -
 94
94 -
 95
95 -
 96
96 -
 97
97 -
 98
98 -
 99
99 -
 100
100 -
 101
101 -
 102
102 -
103
-
104
-
105
-
106
-
107
-
108
-
109
-
110
-
111
-
112
-
113
-
114
-
115
-
116
-
117
-
118
-
119
-
120
-
121
-
122
-
123
-
124
-
125
-
126
-
127
-
128
-
129
-
130
-
131
-
132
-
133
-
134
-
135
-
136
-
137
-
138
-
139
-
140
-
141
-
142
-
143
-
144
-
145
-
146
-
147
-
148
-
149
-
150
-
151
-
152
-
153
-
154
-
155
-
156
-
157
-
158
-
159
-
160
-
161
-
162
-
163
-
164
-
165
-
166
-
167
-
168
-
169
-
170
-
171
-
172
-
173
-
174
-
175
-
176
-
177
-
178
-
179
-
180
-
181
-
182
-
183
-
184
 |
 |
