HP Designjet 10000s HP Designjet 10000 Series - Dryer Document - Page 12
How to assemble the dryer
 |
View all HP Designjet 10000s manuals
Add to My Manuals
Save this manual to your list of manuals |
Page 12 highlights
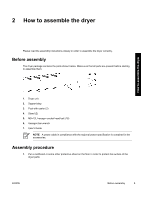
How to assemble the dryer 2. Secure a foot (3) to each stand (1) with the hexagon socket head bolts (2). 3. Place the dryer unit (1) on the protective sheet with its air outlet face up. 4. Remove knobs (3) (two at each side) from both ends of the dryer unit (1). NOTE Do not remove the washers (2) from the dryer (1). 6 Chapter 2 How to assemble the dryer ENWW
-
 1
1 -
2
-
3
-
4
-
5
-
6
-
 7
7 -
 8
8 -
 9
9 -
 10
10 -
 11
11 -
 12
12 -
 13
13 -
 14
14 -
 15
15 -
 16
16 -
 17
17 -
18
-
19
-
20
-
21
-
22
-
23
-
24
-
25
-
26
-
27
-
28
-
29
-
30
-
31
-
32
-
33
-
34
-
35
-
36
-
37
-
38
-
39
-
40
-
41
-
42
-
43
-
44
-
45
-
46
-
47
-
48
-
49
-
50
-
51
-
52
-
53
-
54
-
55
-
56
-
57
-
58
-
59
-
60
-
61
-
62
-
63
-
64
-
65
-
66
-
67
-
68
-
69
-
70
-
71
-
72
-
73
-
74
-
75
-
76
-
77
-
78
-
79
-
80
-
81
-
82
-
83
-
84
-
85
-
86
-
87
-
88
-
89
-
90
-
91
-
92
-
93
-
94
-
95
-
96
-
97
-
98
-
99
-
100
-
101
-
102
-
103
-
104
-
105
-
106
-
107
-
108
-
109
-
110
-
111
-
112
-
113
-
114
-
115
-
116
-
117
-
118
-
119
-
120
-
121
-
122
-
123
-
124
-
125
-
126
-
127
-
128
-
129
-
130
-
131
-
132
-
133
-
134
-
135
-
136
-
137
-
138
-
139
-
140
 |
 |

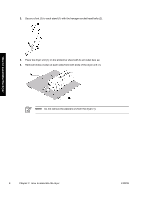
2.
Secure a foot (3) to each stand (1) with the hexagon socket head bolts (2).
3.
Place the dryer unit (1) on the protective sheet with its air outlet face up.
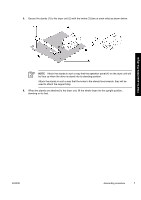
4.
Remove knobs (3) (two at each side) from both ends of the dryer unit (1).
NOTE
Do not remove the washers (2) from the dryer (1).
6
Chapter 2
How to assemble the dryer
ENWW
How to assemble the dryer