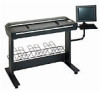
HP Designjet 4200 HP Designjet 4200 Scanner - Assembly and Maintenance Poster - Page 2
Secure the cross bar to the right leg using two - parts
 |
View all HP Designjet 4200 manuals
Add to My Manuals
Save this manual to your list of manuals |
Page 2 highlights
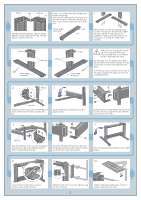
left leg tabs right leg cut Identify the left and right legs. They are slightly different in shape at the top of the leg. The right leg has a small cut at the top. In step 1 you will attach the left and right feet to the left and right legs. Each foot has a slot for the leg. This slot is not in the center of the foot. When you attach the leg, make sure the shorter length of the foot is at the front. shorter length at the front foot slot 1 Attach the feet to the left and right legs using four M5×14 screws (two for each foot). Tighten the screws with the Torx key found in the assembly kit. Make sure the tabs at the top of each leg face in towards the middle of the assembly. tabs shorter length at the front tabs right leg left leg shorter length at the front At this point you must decide on which side you are going to fit the touch screen assembly. This can be fitted on the left or right side of the stand. The next steps, 2 to 15, explain how to fit the top bar and the touch screen assembly when the touch screen is located on the right side of the stand. To fit the touch screen assembly to the left side of the stand, using the same parts, just 'mirror' the assembly procedure. 2 left leg 3 4 cross bar Slide the cross bar into the slot on the left leg and secure with two M5×14 screws using the Torx key. Lay the left leg and cross bar down into the position shown. 5 6 Slide the top bar onto the left leg and secure with four M5×14 screws using the Torx key. Note the position of the screw holes. 7 right leg Slide the right leg onto the cross bar and top bar. Secure the cross bar to the right leg using two M5×14 screws and the Torx key. Attach the right side of the top bar to the top of the right leg and secure with two M5×14 screws. Use only the two screws shown above. Raise the stand assembly carefully into the upright position. 8 9 10 Secure the front of the top bar using two M5×14 screws and the Torx key. Attach the touch screen arm to the right leg using four M5×12 screws. 2 Slide the keyboard assembly down as far as it will go on the touch screen arm.
-
 1
1 -
 2
2 -
 3
3 -
 4
4 -
 5
5 -
 6
6
 |
 |
