HP Designjet L65500 HP Designjet L65500 Printer series - Installation Guide (E - Page 57
Print the HP test images
 |
View all HP Designjet L65500 manuals
Add to My Manuals
Save this manual to your list of manuals |
Page 57 highlights
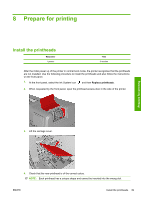
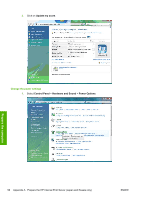
NOTE: The covers are wrapped in plastic, and the screws are inside the packaging. It is recommended to install the covers last, in case of any issue that may require you to remove the covers. It is recommended to wear gloves when removing the covers. 1. On the left side, replace the six T30 screws that secure each cover. The position of the screws is the same on the rear cover as it is on the front cover. 2. On the right side, replace the four T30 screws that secure the rear cover. 3. On the right side, replace the four T30 screws that secure the sliding door, starting at the top. Prepare for printing Print the HP test images Test images are available with which you can check the print quality achieved once the printer has been fully installed. From HP's Web site (http://www.hp.com/), select Support & drivers, check Download software & drivers, type L65500, select Drivers, and download the pre-ripped images. NOTE: The test prints are also available in the Internal Print Server computer if your printer has a serial number beginning with SG95 or greater. ENWW Print the HP test images 53
-
 1
1 -
2
-
3
-
4
-
5
-
6
-
7
-
8
-
9
-
10
-
11
-
12
-
13
-
14
-
15
-
16
-
17
-
18
-
19
-
20
-
21
-
22
-
23
-
24
-
25
-
26
-
27
-
28
-
29
-
30
-
31
-
32
-
33
-
34
-
35
-
36
-
37
-
38
-
39
-
40
-
41
-
42
-
43
-
44
-
45
-
46
-
47
-
48
-
49
-
50
-
51
-
 52
52 -
 53
53 -
 54
54 -
 55
55 -
 56
56 -
 57
57 -
 58
58 -
 59
59 -
 60
60 -
 61
61 -
 62
62 -
63
-
64
-
65
-
66
-
67
-
68
-
69
-
70
 |
 |
