HP Deskjet 1280 HP Deskjet 1280 - Getting Started Guide - Page 6
Schritt 3: Sehen Sie sich die Einzelteile des Druckers an
 |
View all HP Deskjet 1280 manuals
Add to My Manuals
Save this manual to your list of manuals |
Page 6 highlights
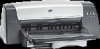
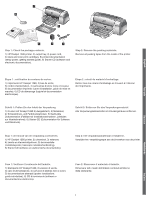
English 3 2 4 56 7 1 6 2 1 8 9 Step 3: Identify printer parts (front). 1) Output tray, 2) paper guide, 3) access cover, 4) Print Cartridge light, 5) Cancel button, 6) Resume button, 7) Power button, 8) postcard guide, 9) main paper tray. 34 5 Identify printer parts (back). 1) Universal serial bus (USB) port, 2) parallel port, 3) rear manual feed, 4) removable panel knob, 5) removable panel, 6) power input. Etape 3 : identification des éléments de l'imprimante (face avant). 1) bac de sortie, 2) guides du papier, 3) capot d'accès, 4) voyant de cartouche d'impression, 5) bouton d'annulation, 6) bouton de reprise, 7) bouton d'alimentation, 8) guide pour cartes postales, 9) bac principal. identification des éléments de l'imprimante (face arrière). 1) port USB, 2) port parallèle, 3) module d'alimentation manuelle arrière, 4) bouton de panneau amovible, 5) panneau amovible, 6) entrée d'alimentation. Schritt 3: Sehen Sie sich die Einzelteile des Druckers an (Vorderseite). 1) Ausgabefach, 2) Papierführungen, 3) Gerätedeckel, 4) Druckpatronenleuchte, 5) Cancel-Taste, 6) Resume-Taste, 7) Netzschalter, 8) Postkartenführung, 9) Hauptpapierfach. Sehen Sie sich die Einzelteile des Druckers an (Rückseite). 1) USB-Anschluss, 2) Parallelanschluss, 3) Hinterer manueller Einzug, 4) Drehknauf für abnehmbare Abdeckung, 5) Abnehmbare Abdeckung, 6) Netzanschluss. Stap 3: de printeronderdelen controleren (voorkant). 1) uitvoerbak, 2) papiergeleiders, 3) toegangsklep, 4) inktpatroonlampje, 5) knop Annuleren, 6) knop Doorgaan, 7) Aan/Uit-knop, 8) briefkaartgeleider, 9) hoofdlade. De printeronderdelen controleren (achterkant). 1) Universal serial bus (USB)-poort, 2) parallelle poort, 3) handinvoer aan de achterkant, 4) knop van verwijderbaar paneel, 5) verwijderbaar paneel, 6) stroomaansluiting. Français Deutsch Nederlands Fase 3: Identificare le parti della stampante (anteriore). 1) Vassoio di uscita, 2) guide carta, 3) coperchio di accesso, 4) spia Cartuccia di stampa, 5) pulsante Annulla, 6) pulsante Riavvia, 7) pulsante Accensione, 8) guida cartoline, 9) vassoio principale carta. Identificare le parti della stampante (posteriore). 1) Porta USB, 2) porta parallela, 3) alimentazione manuale dal retro, 4) manopola pannello removibile, 5) pannello removibile, 6) ingresso alimentazione. Italiano 4
-
 1
1 -
 2
2 -
 3
3 -
 4
4 -
 5
5 -
 6
6 -
 7
7 -
 8
8 -
 9
9 -
 10
10 -
 11
11 -
 12
12 -
13
-
14
-
15
-
16
-
17
-
18
-
19
-
20
-
21
-
22
-
23
-
24
 |
 |
