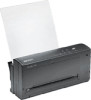
HP Deskjet 340 HP DeskJet 340 Printer - (English) User's Guide - Page 10
Using Battery Power Supply, Installing the Battery Pack, Maximizing Battery Pack Performance
 |
View all HP Deskjet 340 manuals
Add to My Manuals
Save this manual to your list of manuals |
Page 10 highlights
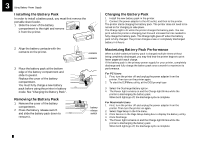
3 Using Battery Power Supply Installing the Battery Pack In order to install a battery pack, you must first remove the portable sheet feeder. 1 Slide the cover of the battery compartment to the right and remove it from the printer. 2 Align the battery contacts with the contacts on the printer. 3 Place the battery pack at the bottom edge of the battery compartment and slide it upward. Replace the cover of the battery compartment. You must fully charge a new battery pack before using the printer in battery mode. See "Charging the Battery Pack". Removing the Battery Pack 1 Remove the cover of the battery compartment. 2 Press the battery release switch and slide the battery pack down to remove it. BPATATCEKRY BPATATCEKRY contacts contacts battery release switch Charging the Battery Pack 1 Install the new battery pack in the printer. 2 Connect the power adapter to the AC outlet, and then to the printer. The printer starts charging the battery pack. The printer does not need to be turned on for charging to take place. The Charge light is lit while the printer charges the battery pack. You can print while the printer is charging, but this will increase the time needed to fully charge the battery pack. The Charge light goes off when the battery pack is fully charged. The printer charges a new or completely discharged battery in 6 hours. Maximizing Battery Pack Performance When a nickel-cadmium battery pack is charged multiple times without being completely discharged, you may find that the printer begins to print fewer pages with each charge. If the battery pack is the primary power supply for your printer, completely discharge and fully charge the battery pack once a month to maximize its performance. For PC Users 1 First, turn the printer off and unplug the power adapter from the printer. Then turn on the printer again. 2 To start the DJPMenu utility, at the DOS prompt type C:\deskjet\djpmenu. 3 Select the Discharge Battery option. 4 The Power light remains on and the Charge light blinks while the printer is discharging the battery pack. When both lights go off, the discharge cycle is complete For Macintosh Users 1 First, turn the printer off and unplug the power adapter from the printer. Then turn the printer on again. 2 Select Page Setup in the File menu. 3 Click Service in the Page Setup dialog box to display the Battery utility. 4 Click Discharge. 5 The Power light remains on and the Charge light blinks while the printer is discharging the battery pack. When both lights go off, the discharge cycle is complete. 8
-
 1
1 -
2
-
3
-
4
-
 5
5 -
 6
6 -
 7
7 -
 8
8 -
 9
9 -
 10
10 -
 11
11 -
 12
12 -
 13
13 -
 14
14 -
 15
15 -
16
-
17
-
18
-
19
-
20
 |
 |
