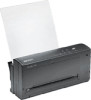
HP Deskjet 340 HP DeskJet 340 Printer - (English) User's Guide - Page 7
Feeding Paper Manually, Printing Transparencies, Labels, and Special Paper, Paper Types Not Supported
 |
View all HP Deskjet 340 manuals
Add to My Manuals
Save this manual to your list of manuals |
Page 7 highlights
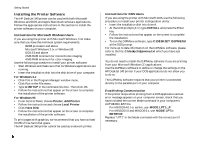
Feeding Paper Manually You may find that the paper you have loaded into the portable sheet feeder is not feeding well into the printer. In such cases you may wish to remove the portable sheet feeder and try feeding each sheet by hand. See "Removing the Portable Sheet Feeder" at the end of this chapter. To feed a sheet into the printer: 1 Insert the sheet into the paper feed slot with the edge of the paper against the alignment mark. Always insert the sheet with the print side up. Release the sheet when the printer pulls it in. 2 The printer will print on this sheet and eject it. The Paper Feed light will blink if the print job requires you to insert another sheet. If you expect to feed many pages by hand, select the manual feeding option in the software. When you reattach the portable sheet feeder, make sure that the portable sheet feeder is selected in the software. If manual feed is selected, the sheet feeder will not operate. Getting Started Printing Transparencies, Labels and Special Paper You can print on transparencies, glossy paper, labels, heavy stock and other special paper in the same way that you print on ordinary paper with the HP DeskJet 340 printer. When using transparencies and glossy paper • Load transparencies with the rough side up and the paper strip edge first. • Do not load more than 10 transparencies into the sheet feeder. • Use only HP Premium transparencies and glossy paper. • Keep in mind that, with transparencies and glossy paper, the ink needs more time to dry. - While a sheet is drying, the Paper Feed light remains lit. - Your printer software automatically determines the extra time needed for drying. A second sheet will not be printed if this sheet would exit the printer on top of a wet one. - Alternatively, you can turn off the automatic delay and remove the wet sheet by hand. Place wet sheets in a drying area, out of direct sunlight. When using heavy stock and other special paper If you are having difficulty printing on heavy stock, you can remove the portable sheet feeder and insert the sheet by hand. Paper Types Not Supported Do not use the following : • paper with a weight greater than 24 lb. (90 g/m2) or • less than 16 lb. (60 g/m2) • paper with cutouts or perforations • paper that is torn, wrinkled, or has curled edges, or that is heavily textured or embossed • envelopes • transparencies other than HP Premium transparencies • multiple part forms 5
-
 1
1 -
 2
2 -
 3
3 -
 4
4 -
 5
5 -
 6
6 -
 7
7 -
 8
8 -
 9
9 -
 10
10 -
 11
11 -
 12
12 -
13
-
14
-
15
-
16
-
17
-
18
-
19
-
20
 |
 |
