HP ENVY Notebook - m7-k111dx HP ENVY 17 Notebook PC HP ENVY 15 Notebook PC HP - Page 78
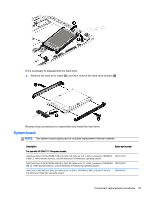
Remove the battery see, and then unplugging the AC adapter from the computer.
 |
View all HP ENVY Notebook - m7-k111dx manuals
Add to My Manuals
Save this manual to your list of manuals |
Page 78 highlights
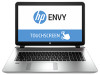
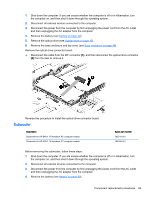
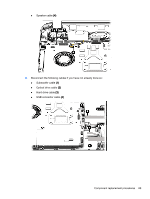
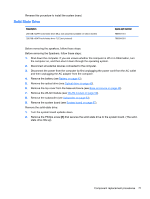
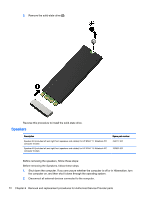
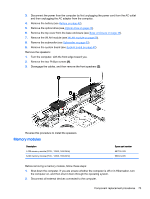
Description Spare part number System board Intel Dual Core i7-4510U (2.0-GHz, SC turbo up to 3.1-GHz), processor (1600MHz/4 MB L3, 15W) discrete memory, and the Windows 8 Standard operating system 763721-501 Intel Dual Core i7-4510U (2.0 GHz, SC turbo up to 3.1 GHz), processor (1600 MHz/4 MB L3, 15 763721-601 W) discrete memory, and the Windows 8 Professional operating system Intel Dual Core i5-4210U 840M 2 GB 1.7-GHz (SC turbo up to 2.7-GHz) processor (1600- MHz, 763730-501 3.0 MB L3 cache, 15 W) discrete memory, and the Windows 8 Standard operating system Intel Dual Core i5-4210U 840M 2 GB 1.7-GHz (SC turbo up to 2.7-GHz) processor (1600- MHz, 763730-601 3.0 MB L3 cache, 15 W) discrete memory, and the Windows 8 Professional operating system Intel Quad Core i7-4710HQ 2.5 GHz (SC turbo up to 3.50 GHz) processor (1600-MHz, 6.0 MB L3 cache, 47 W) UMA memory, and the Windows 8 Standard operating system 773128-501 Intel Quad Core i7-4710HQ 2.50 GHz (SC turbo up to 3.50 GHz) processor (1600-MHz, 6.0 MB 773128-601 L3 cache, 47 W) UMA memory, and the Windows 8 Professional operating system For use with HP ENVY 15 Computer models: Intel Core i5-4210U 850M (1.7 GHz, SC turbo up to 2.7 GHz), 1600 MHz/3 MB L3, Dual 1 5 W for the FreeDos and Ubuntu Linux operating system 784331-001 Intel Core i5-4210U 850M (1.7 GHz, SC turbo up to 2.7GHz), 1600 MHz/3 MB L3, Dual 1 5 W and the Windows 8 Standard operating system 784331-501 Intel Core i5-5200U (2.2GHz, SC turbo up to 2.7GHz), 1600MHz/xMB L3, Dual 15 W and the Windows 8 Professional operating system 784331-601 Before removing the system board, follow these steps: 1. Shut down the computer. If you are unsure whether the computer is off or in Hibernation, turn the computer on, and then shut it down through the operating system. 2. Disconnect all external devices connected to the computer. 3. Disconnect the power from the computer by first unplugging the power cord from the AC outlet and then unplugging the AC adapter from the computer. 4. Remove the battery (see Battery on page 42), 5. Remove the optical drive (see Optical drive on page 43). 6. Remove the top cover from the base enclosure (see Base enclosure on page 46). 7. Remove the WLAN module (see WLAN module on page 59). 8. Remove the subwoofer (see Subwoofer on page 63). Remove the system board: 1. Remove the following cables if you have not already done so: ● Power connector board cable (1) ● Display cables (2), and (3) 68 Chapter 6 Removal and replacement procedures for Authorized Service Provider parts
-
 1
1 -
2
-
3
-
4
-
5
-
6
-
7
-
8
-
9
-
10
-
11
-
12
-
13
-
14
-
15
-
16
-
17
-
18
-
19
-
20
-
21
-
22
-
23
-
24
-
25
-
26
-
27
-
28
-
29
-
30
-
31
-
32
-
33
-
34
-
35
-
36
-
37
-
38
-
39
-
40
-
41
-
42
-
43
-
44
-
45
-
46
-
47
-
48
-
49
-
50
-
51
-
52
-
53
-
54
-
55
-
56
-
57
-
58
-
59
-
60
-
61
-
62
-
63
-
64
-
65
-
66
-
67
-
68
-
69
-
70
-
71
-
72
-
 73
73 -
 74
74 -
 75
75 -
 76
76 -
 77
77 -
 78
78 -
 79
79 -
 80
80 -
 81
81 -
 82
82 -
 83
83 -
84
-
85
-
86
-
87
-
88
-
89
-
90
-
91
-
92
-
93
-
94
-
95
-
96
-
97
-
98
-
99
-
100
-
101
-
102
-
103
-
104
-
105
-
106
-
107
-
108
-
109
-
110
-
111
-
112
-
113
 |
 |