HP ENVY m6-aq100 Maintenance and Service Guide - Page 55
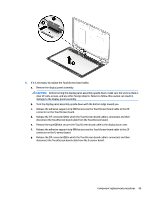
CAUTION, Before turning the display panel assembly upside down, make sure the work surface is
 |
View all HP ENVY m6-aq100 manuals
Add to My Manuals
Save this manual to your list of manuals |
Page 55 highlights
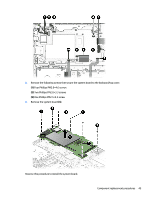
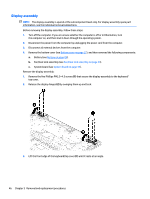
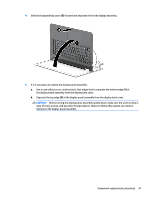
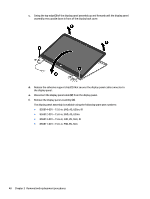
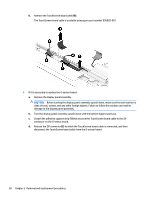
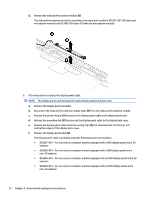
4. Slide the keyboard/top cover (2) forward and separate it from the display assembly. 5. If it is necessary to replace the display panel assembly: a. Use a case utility tool or similar plastic, flat-edged tool to separate the bottom edge (1) of the display panel assembly from the display back cover. b. Separate the top edge (2) of the display panel assembly from the display back cover. CAUTION: Before turning the display panel assembly upside down, make sure the work surface is clear of tools, screws, and any other foreign objects. Failure to follow this caution can result in damage to the display panel assembly. Component replacement procedures 47
-
 1
1 -
2
-
3
-
4
-
5
-
6
-
7
-
8
-
9
-
10
-
11
-
12
-
13
-
14
-
15
-
16
-
17
-
18
-
19
-
20
-
21
-
22
-
23
-
24
-
25
-
26
-
27
-
28
-
29
-
30
-
31
-
32
-
33
-
34
-
35
-
36
-
37
-
38
-
39
-
40
-
41
-
42
-
43
-
44
-
45
-
46
-
47
-
48
-
49
-
 50
50 -
 51
51 -
 52
52 -
 53
53 -
 54
54 -
 55
55 -
 56
56 -
 57
57 -
 58
58 -
 59
59 -
 60
60 -
61
-
62
-
63
-
64
-
65
-
66
-
67
-
68
-
69
-
70
-
71
-
72
-
73
-
74
-
75
-
76
-
77
-
78
-
79
-
80
 |
 |

4.
Slide the keyboard/top cover
(2)
forward and separate it from the display assembly.
5.
If it is necessary to replace the display panel assembly:
a.
Use a case utility tool or similar plastic,
flat-edged
tool to separate the bottom edge
(1)
of
the display panel assembly from the display back cover.
b.
Separate the top edge
(2)
of the display panel assembly from the display back cover.
CAUTION:
Before turning the display panel assembly upside down, make sure the work surface is
clear of tools, screws, and any other foreign objects. Failure to follow this caution can result in
damage to the display panel assembly.
Component replacement procedures
47