HP Indigo 7000 Users Guide - Page 128
Replacing the blanket, Removing the old blanket, Standby, PIP and Blanket, Blanket Replacement
 |
View all HP Indigo 7000 manuals
Add to My Manuals
Save this manual to your list of manuals |
Page 128 highlights
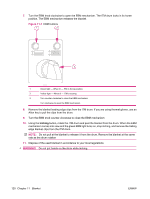
Replacing the blanket To replace the blanket: ● Remove the old blanket ● Install the new blanket ● Perform first transfer pressure calibration Removing the old blanket NOTE: Check the condition of the impression paper whenever the blanket is replaced. Replace it if necessary. Always use the inch-safe method when rotating drums. WARNING! The ITM drum is very hot and can burn you if touched. Always allow the drums to cool before handing the blanket. CAUTION: Wear safety glasses and thermal gloves for this procedure. 1. Go to Standby. 2. On the press software, select Main, PIP and Blanket, then Blanket Replacement. The Blanket Replacement Wizard opens 3. Use the barcode reader to read the label on the new blanket wrapper. Enter the reason for blanket replacement and click Next. 4. In the touch screen, click the Prepare button, and wait until the temperature is 60 °C (140 °F) or less before proceeding; or click Next if you are using thermal safety gloves and do not want to wait for the drum to cool. 5. Access the blanket area, open the upper feed door, lift the feeder bridge, and open the external heating housing door. 6. Press the Inching button to advance the ITM drum until the green light on the EBM control turns on. The ITM drum stops turning at this point, even if you keep pushing the Inching button. ENWW Replacing the blanket 119
-
 1
1 -
2
-
3
-
4
-
5
-
6
-
7
-
8
-
9
-
10
-
11
-
12
-
13
-
14
-
15
-
16
-
17
-
18
-
19
-
20
-
21
-
22
-
23
-
24
-
25
-
26
-
27
-
28
-
29
-
30
-
31
-
32
-
33
-
34
-
35
-
36
-
37
-
38
-
39
-
40
-
41
-
42
-
43
-
44
-
45
-
46
-
47
-
48
-
49
-
50
-
51
-
52
-
53
-
54
-
55
-
56
-
57
-
58
-
59
-
60
-
61
-
62
-
63
-
64
-
65
-
66
-
67
-
68
-
69
-
70
-
71
-
72
-
73
-
74
-
75
-
76
-
77
-
78
-
79
-
80
-
81
-
82
-
83
-
84
-
85
-
86
-
87
-
88
-
89
-
90
-
91
-
92
-
93
-
94
-
95
-
96
-
97
-
98
-
99
-
100
-
101
-
102
-
103
-
104
-
105
-
106
-
107
-
108
-
109
-
110
-
111
-
112
-
113
-
114
-
115
-
116
-
117
-
118
-
119
-
120
-
121
-
122
-
 123
123 -
 124
124 -
 125
125 -
 126
126 -
 127
127 -
 128
128 -
 129
129 -
 130
130 -
 131
131 -
 132
132 -
 133
133 -
134
-
135
-
136
-
137
-
138
-
139
-
140
-
141
-
142
-
143
-
144
-
145
-
146
-
147
-
148
-
149
-
150
-
151
-
152
-
153
-
154
-
155
-
156
-
157
-
158
-
159
-
160
-
161
-
162
-
163
-
164
-
165
-
166
-
167
-
168
-
169
-
170
-
171
-
172
-
173
-
174
-
175
-
176
-
177
-
178
-
179
-
180
-
181
-
182
-
183
-
184
-
185
-
186
-
187
-
188
-
189
-
190
-
191
-
192
-
193
-
194
-
195
-
196
-
197
-
198
-
199
-
200
-
201
-
202
-
203
-
204
-
205
-
206
-
207
-
208
-
209
-
210
-
211
-
212
-
213
-
214
-
215
-
216
-
217
-
218
-
219
-
220
 |
 |
