HP Kayak XU 04xx HP Kayak XU Series 04xx, HP Visualize Fx6 Configuration and - Page 17
The Gamma Correction panel, Creating Custom Driver Configurations, Save As Button, Delete Button
 |
View all HP Kayak XU 04xx manuals
Add to My Manuals
Save this manual to your list of manuals |
Page 17 highlights
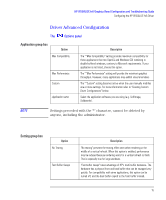
HP VISUALIZE fx6 Graphics Board Configuration and Troubleshooting Guide Configuring the HP VISUALIZE fx6 Driver The Gamma Correction panel Gamma correction is used to correct non-linearity in the phosphor brightness of monitors. It can be used to improve the appearance of antialiased lines, shaded graphic images, or scanned photographic images that have not already been gamma corrected. Creating Custom Driver Configurations The Options panel allows you to create customized driver configurations for the HP VISUALIZE fx6. These configurations appear in the Application group box. To create a customized profile 1 Set the desired options in the Settings group box This will select the "*Custom" setting in the Application group box. 2 Click the Save As button to save the current configuration. You are prompted for a profile name. 3 Type a Configuration name in the Save Configuration dialog box. This name will appear in the Application group box. Save As Button Allows you to save the current "*Custom" configuration, as a named, user-specific configuration. Delete Button Allows you to delete a custom configuration. English 17
-
 1
1 -
2
-
3
-
4
-
5
-
6
-
7
-
8
-
9
-
10
-
11
-
 12
12 -
 13
13 -
 14
14 -
 15
15 -
 16
16 -
 17
17 -
 18
18 -
 19
19 -
 20
20 -
 21
21 -
 22
22 -
23
 |
 |
