HP L1520 hp l1820 18'', l1720 17'', l1520 15'' lcd monitor - p4829a user's gui - Page 18
to a power source, even when the computer and the LCD, panel are turned off. - adapter
 |
View all HP L1520 manuals
Add to My Manuals
Save this manual to your list of manuals |
Page 18 highlights
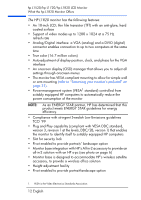
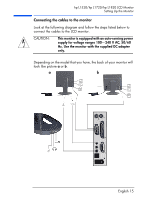
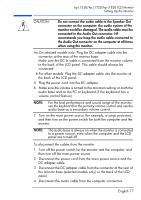
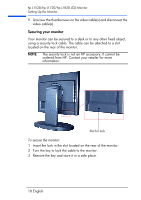
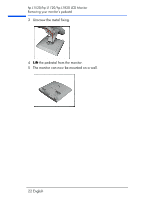
hp L1520/hp L1720/hp L1820 LCD Monitor Setting Up the Monitor CAUTION: Do not connect the audio cable to the Speaker Out connector on the computer: the audio system of the monitor could be damaged. The audio cable must be connected to the Audio Out connector. HP recommends you keep the audio cable connected to the Audio Out connector on the computer at all times when using the monitor. 4a.On selected models only: Plug the DC adapter cable into the connector at the rear of the monitor base. Make sure the DC In cable is connected from the monitor column to the back of the LCD panel. This cable should always be connected. b.For other models: Plug the DC adapter cable into the monitor at the back of the LCD panel. 5 Plug the power cord into the DC adapter. 6 Make sure the volume is turned to the minimum setting on both the audio base and on the PC or keyboard (if the keyboard has a volume control feature). NOTE: For the best performance and sound range of the monitor, use the keyboard for the primary volume control and use the audio base as a secondary volume control. 7 Turn on the main power source (for example, a surge protector), and then turn on the power switch for both the computer and the monitor. NOTE: The audio base is always on when the monitor is connected to a power source, even when the computer and the LCD panel are turned off. To disconnect the cables from the monitor: 1 Turn off the power switch for the monitor and the computer, and then turn off the main power source. 2 Disconnect the power cord from the main power source and the DC adapter cable. 3 Disconnect the DC adapter cable from the connector at the rear of the monitor base (selected models only) or the back of the LCD panel. 4 Disconnect the audio cable from the computer connectors. English 17
-
 1
1 -
2
-
3
-
4
-
5
-
6
-
7
-
8
-
9
-
10
-
11
-
12
-
 13
13 -
 14
14 -
 15
15 -
 16
16 -
 17
17 -
 18
18 -
 19
19 -
 20
20 -
 21
21 -
 22
22 -
 23
23 -
24
-
25
-
26
-
27
-
28
-
29
-
30
-
31
-
32
-
33
-
34
-
35
-
36
-
37
-
38
-
39
-
40
-
41
-
42
-
43
-
44
-
45
-
46
-
47
-
48
-
49
-
50
-
51
-
52
-
53
-
54
-
55
-
56
-
57
 |
 |