HP LH4r HP Netserver LH 4 Installation Road Map
HP LH4r - NetServer - 256 MB RAM Manual
 |
View all HP LH4r manuals
Add to My Manuals
Save this manual to your list of manuals |
HP LH4r manual content summary:
- HP LH4r | HP Netserver LH 4 Installation Road Map - Page 1
not be liable for errors contained herein or reliability of its software on equipment that is HP NetServer Audience Assumptions This road map is intended for the person who installs, administers, and troubleshoots LAN servers. Hewlett-Packard Company assumes that you are qualified in the servicing - HP LH4r | HP Netserver LH 4 Installation Road Map - Page 2
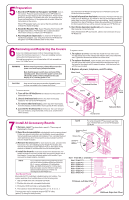
CompuServe site containing the drivers and software. your fax machine), and request document number 6005 ! Internet WWW-http://www.hp.com/netserver/servsup ! Internet FTP-ftp://ftp.hp.com/pub/servers ! CompuServe-GO HPPC; download 6005.txt from the NetServer library 4 Connect Monitor, Keyboard - HP LH4r | HP Netserver LH 4 Installation Road Map - Page 3
the power-on button on the HP NetServer, and press the eject button on the CD-ROM drive. Place the HP NetServer Navigator CD-ROM in the drive, and close the drive. Press the Reset button. If the system fails to restart, follow the instructions on the screen. When HP Navigator starts, you can set the - HP LH4r | HP Netserver LH 4 Installation Road Map - Page 4
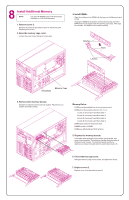
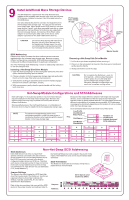
Use only HP DIMMs listed in HP Information Assistant or in HP Order Assistant. DIMM is not inserted correctly. Notches Keys Latches Hard Disks Memory Cage 3. Remove both memory boards. Insert each memory board, one at a time, into its guide, and press it into its socket. The retaining clips flip - HP LH4r | HP Netserver LH 4 Installation Road Map - Page 5
HP NetServer supports both hot-swap SCSI devices, installed in the hot-swap mass storage cage, and non-hot swap SCSI devices, installed in shelves 3 and 4 (located below the CD-ROM drive hard disk or a tape backup drive. Narrow (50-pin) SCSI devices are supported problems, install hot-swap drives - HP LH4r | HP Netserver LH 4 Installation Road Map - Page 6
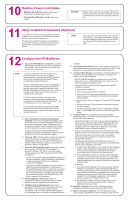
the hard disk drive. Installation Assistant then guides you through the NOS installation and configures the NOS with the appropriate drivers for the HP-bundled configuration or for network interface cards on HP's Tested Products List. ! B. Manual NOS Installation: Follow the instructions on
-
 1
1 -
 2
2 -
 3
3 -
 4
4 -
 5
5 -
 6
6
 |
 |

Notice
The information contained in this document is subject to change
without notice.
Hewlett-Packard makes no warranty of any kind with
regard to this material, including, but not limited to, the
implied warranties of merchantability and fitness for a
particular purpose. Hewlett-Packard shall not be liable for
errors contained herein or for incidental or consequential
damages in connection with the furnishing, performance, or use
of this material.
Hewlett-Packard assumes no responsibility for the use or
reliability of its software on equipment that is not furnished by
Hewlett-Packard.
This document contains proprietary information that is protected
by copyright. All rights are reserved. No part of this document
may be photocopied, reproduced, or translated to another
language without the prior written consent of Hewlett-Packard
Company.
Hewlett-Packard Company
Network Server Division
Technical Communications/MS 45S-LE
10955 Tantau Avenue
Cupertino, CA 95014 USA
© Copyright 1998, Hewlett-Packard Company
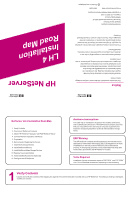
LH 4
Installation
Road Map
HP NetServer
5967-5281
Printed on recycled paper.
Printed in November 1998
Audience Assumptions
This road map is intended for the person who installs, administers,
and troubleshoots LAN servers. Hewlett-Packard Company assumes
that you are qualified in the servicing of computer equipment and
trained in recognizing hazards in products with hazardous energy
levels.
ESD Warning
Tools Required
This HP NetServer contains sensitive electronic devices that can be
damaged by electrostatic discharge (ESD). ESD hazards are a result
of installation or service personnel failing to ground themselves
properly. To be properly grounded, use a proper ESD wrist strap and
work surface grounded to the HP NetServer chassis.
Installation of some accessories require a T25 TORX
and T15 TORX
or a 1/4-inch flat blade screwdriver, depending on the accessory.
®
®
1. Verify Contents
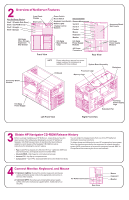
2. Overview of NetServer Features
3. Obtain
Release History
4. Connect Monitor, Keyboard, and Mouse
5. Preparation
6. Removing and Replacing the Covers
7. Install All Accessory Boards
8. Install Additional Memory
9. Install Additional Mass Storage Devices
10. Replace Covers and Cables
11. Verify Installed Accessories (Optional)
12. Configure the HP NetServer
HP NetServer Navigator CD-ROM
NetServer LH 4 Installation Road Map
1
Verify Contents
Unpack and verify the contents of the shipping box against the Contents Checklist included with your HP NetServer. If anything is missing or damaged,
contact your reseller.