HP LaserJet 1100 Service Manual - Page 96
Pressure roller removal continued
 |
View all HP LaserJet 1100 manuals
Add to My Manuals
Save this manual to your list of manuals |
Page 96 highlights
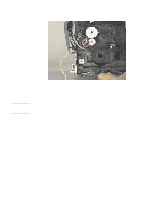
Pressure roller removal (continued) CAUTION: Figure 4-37Removing the pressure roller This Pressure Roller is covered with light contact grease. Do not get it on your clothes. See Chapter 6, "Parts and diagrams," for information about ordering pressure roller grease. NOTE: The half bushing on the right of the assembly or the full bushing on the left end of the assembly are not connected to the printer chassis and may come loose during removal. 3 Loosen the two screws in the fusing guide (see callouts). 4 Lift the right end of the Pressure Roller out of the half bushing and slowly move the roller to the right, pulling the left end of the roller axle out of the opening on the left side of the printer. 100 Removal and Replacement C4224-90962
-
 1
1 -
2
-
3
-
4
-
5
-
6
-
7
-
8
-
9
-
10
-
11
-
12
-
13
-
14
-
15
-
16
-
17
-
18
-
19
-
20
-
21
-
22
-
23
-
24
-
25
-
26
-
27
-
28
-
29
-
30
-
31
-
32
-
33
-
34
-
35
-
36
-
37
-
38
-
39
-
40
-
41
-
42
-
43
-
44
-
45
-
46
-
47
-
48
-
49
-
50
-
51
-
52
-
53
-
54
-
55
-
56
-
57
-
58
-
59
-
60
-
61
-
62
-
63
-
64
-
65
-
66
-
67
-
68
-
69
-
70
-
71
-
72
-
73
-
74
-
75
-
76
-
77
-
78
-
79
-
80
-
81
-
82
-
83
-
84
-
85
-
86
-
87
-
88
-
89
-
90
-
 91
91 -
 92
92 -
 93
93 -
 94
94 -
 95
95 -
 96
96 -
 97
97 -
 98
98 -
 99
99 -
 100
100 -
 101
101 -
102
-
103
-
104
-
105
-
106
-
107
-
108
-
109
-
110
-
111
-
112
-
113
-
114
-
115
-
116
-
117
-
118
-
119
-
120
-
121
-
122
-
123
-
124
-
125
-
126
-
127
-
128
-
129
-
130
-
131
-
132
-
133
-
134
-
135
-
136
-
137
-
138
-
139
-
140
-
141
-
142
-
143
-
144
-
145
-
146
-
147
-
148
-
149
-
150
-
151
-
152
-
153
-
154
-
155
-
156
-
157
-
158
-
159
-
160
-
161
-
162
-
163
-
164
-
165
-
166
-
167
-
168
-
169
-
170
-
171
-
172
-
173
-
174
-
175
-
176
-
177
-
178
-
179
-
180
-
181
-
182
-
183
-
184
-
185
-
186
-
187
-
188
-
189
-
190
-
191
 |
 |

100
Removal and Replacement
C4224-90962
Pressure roller removal (continued)
Figure 4-37
Removing the pressure roller
CAUTION:
This Pressure Roller is covered with light contact grease. Do not get it on your clothes. See
Chapter 6, “Parts and diagrams,” for information about ordering pressure roller grease.
NOTE:
The half bushing on the right of the assembly or the full bushing on the left end of the assembly
are not connected to the printer chassis and may come loose during removal.
3
Loosen the two screws in the fusing guide (see callouts).
4
Lift the right end of the Pressure Roller out of the half bushing and slowly move the roller
to the right, pulling the left end of the roller axle out of the opening on the left side of the
printer.