HP LaserJet 5200 HP LaserJet 5200L Series Printer - User Guide - Page 103
Cleaning the printer, To clean the printer using the printer control panel, CON DEVICE
 |
View all HP LaserJet 5200 manuals
Add to My Manuals
Save this manual to your list of manuals |
Page 103 highlights
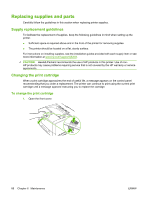
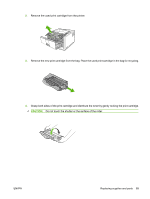
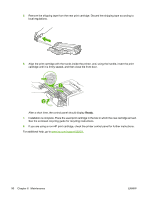
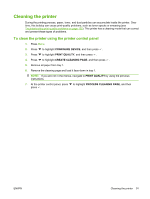
Cleaning the printer During the printing process, paper, toner, and dust particles can accumulate inside the printer. Over time, this buildup can cause print-quality problems, such as toner specks or smearing (see Troubleshooting print-quality problems on page 125). This printer has a cleaning mode that can correct and prevent these types of problems. To clean the printer using the printer control panel 1. Press Menu. 2. Press to highlight CONFIGURE DEVICE, and then press . 3. Press to highlight PRINT QUALITY, and then press . 4. Press to highlight CREATE CLEANING PAGE, and then press . 5. Remove all paper from tray 1. 6. Remove the cleaning page and load it face-down in tray 1. NOTE: If you are not in the menus, navigate to PRINT QUALITY by using the previous instructions. 7. At the printer control panel, press to highlight PROCESS CLEANING PAGE, and then press . ENWW Cleaning the printer 91
-
 1
1 -
2
-
3
-
4
-
5
-
6
-
7
-
8
-
9
-
10
-
11
-
12
-
13
-
14
-
15
-
16
-
17
-
18
-
19
-
20
-
21
-
22
-
23
-
24
-
25
-
26
-
27
-
28
-
29
-
30
-
31
-
32
-
33
-
34
-
35
-
36
-
37
-
38
-
39
-
40
-
41
-
42
-
43
-
44
-
45
-
46
-
47
-
48
-
49
-
50
-
51
-
52
-
53
-
54
-
55
-
56
-
57
-
58
-
59
-
60
-
61
-
62
-
63
-
64
-
65
-
66
-
67
-
68
-
69
-
70
-
71
-
72
-
73
-
74
-
75
-
76
-
77
-
78
-
79
-
80
-
81
-
82
-
83
-
84
-
85
-
86
-
87
-
88
-
89
-
90
-
91
-
92
-
93
-
94
-
95
-
96
-
97
-
 98
98 -
 99
99 -
 100
100 -
 101
101 -
 102
102 -
 103
103 -
 104
104 -
 105
105 -
 106
106 -
 107
107 -
 108
108 -
109
-
110
-
111
-
112
-
113
-
114
-
115
-
116
-
117
-
118
-
119
-
120
-
121
-
122
-
123
-
124
-
125
-
126
-
127
-
128
-
129
-
130
-
131
-
132
-
133
-
134
-
135
-
136
-
137
-
138
-
139
-
140
-
141
-
142
-
143
-
144
-
145
-
146
-
147
-
148
-
149
-
150
-
151
-
152
-
153
-
154
-
155
-
156
-
157
-
158
-
159
-
160
-
161
-
162
-
163
-
164
-
165
-
166
-
167
-
168
-
169
-
170
-
171
-
172
-
173
-
174
-
175
-
176
-
177
-
178
-
179
-
180
-
181
-
182
-
183
-
184
-
185
-
186
-
187
-
188
-
189
-
190
-
191
-
192
-
193
-
194
-
195
-
196
-
197
-
198
-
199
-
200
-
201
-
202
-
203
-
204
-
205
-
206
-
207
-
208
-
209
-
210
-
211
-
212
 |
 |