HP LaserJet Enterprise MFP M725 HP LaserJet Enterprise MFP M725 - User Guide - Page 189
Con default options for fax send jobs, Open the following menus
 |
View all HP LaserJet Enterprise MFP M725 manuals
Add to My Manuals
Save this manual to your list of manuals |
Page 189 highlights
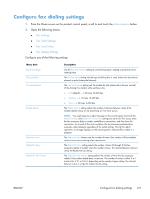
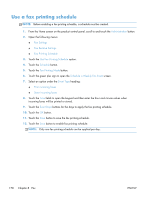
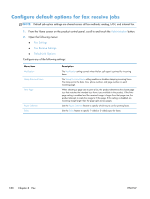
Configure default options for fax send jobs NOTE: Default job option settings are shared across all fax methods; analog, LAN, and internet fax. 1. From the Home screen on the product control panel, scroll to and touch the Administration button. 2. Open the following menus: ● Fax Settings ● Fax Send Settings ● Default Job Options Configure any of the following settings: Menu item Image Preview Resolution Original Sides Notification Content Orientation Original Size Image Adjustment Optimize Text/Picture Description Use the Image Preview feature to preview the fax image before you send it. You can configure the preview to be optional for all users, required for all users, or disabled for all users. The outgoing fax resolution setting determines the maximum resolution supported by the receiving fax. The fax accessory uses the highest possible resolution common to the sending and receiving fax machines (as limited by this setting). NOTE: To reduce phone time, faxes wider than 21.25 cm (8.5 in) are automatically sent by using standard or fine resolution. NOTE: The higher the resolution, the longer the transmission time required. NOTE: LAN fax resolution settings vary by vendor and might differ from the settings listed. Use the Original Sides feature to select 1-sided or 2-sided originals. Use the Notification feature to select when and how you are notified of the status of an outgoing fax. This setting applies to the current fax only. To change the setting permanently, change the default setting. Use the Content Orientation feature to set how the fax content is oriented on the page. For 1-sided pages, choose Portrait (short-edge on top, default setting) or Landscape (long-edge on top). For 2-sided pages, choose Book-style (short-edge on top) or Flip-style (long-edge on top). Use the Original Size feature to match your fax content to the size of the original document. Use the Image Adjustment feature to adjust the Darkness, Contrast, Background Cleanup, or Sharpness settings. In some cases, a gray background on the document causes the fax to transmit more slowly. NOTE: Touch the Default button to reset the sharpness setting to the factory setting. Use the Optimize Text/Picture feature to produce fax output that best matches the original. Sending graphics and photos in text mode results in lower quality images. ENWW Configure default options for fax send jobs 175
-
 1
1 -
2
-
3
-
4
-
5
-
6
-
7
-
8
-
9
-
10
-
11
-
12
-
13
-
14
-
15
-
16
-
17
-
18
-
19
-
20
-
21
-
22
-
23
-
24
-
25
-
26
-
27
-
28
-
29
-
30
-
31
-
32
-
33
-
34
-
35
-
36
-
37
-
38
-
39
-
40
-
41
-
42
-
43
-
44
-
45
-
46
-
47
-
48
-
49
-
50
-
51
-
52
-
53
-
54
-
55
-
56
-
57
-
58
-
59
-
60
-
61
-
62
-
63
-
64
-
65
-
66
-
67
-
68
-
69
-
70
-
71
-
72
-
73
-
74
-
75
-
76
-
77
-
78
-
79
-
80
-
81
-
82
-
83
-
84
-
85
-
86
-
87
-
88
-
89
-
90
-
91
-
92
-
93
-
94
-
95
-
96
-
97
-
98
-
99
-
100
-
101
-
102
-
103
-
104
-
105
-
106
-
107
-
108
-
109
-
110
-
111
-
112
-
113
-
114
-
115
-
116
-
117
-
118
-
119
-
120
-
121
-
122
-
123
-
124
-
125
-
126
-
127
-
128
-
129
-
130
-
131
-
132
-
133
-
134
-
135
-
136
-
137
-
138
-
139
-
140
-
141
-
142
-
143
-
144
-
145
-
146
-
147
-
148
-
149
-
150
-
151
-
152
-
153
-
154
-
155
-
156
-
157
-
158
-
159
-
160
-
161
-
162
-
163
-
164
-
165
-
166
-
167
-
168
-
169
-
170
-
171
-
172
-
173
-
174
-
175
-
176
-
177
-
178
-
179
-
180
-
181
-
182
-
183
-
 184
184 -
 185
185 -
 186
186 -
 187
187 -
 188
188 -
 189
189 -
 190
190 -
 191
191 -
 192
192 -
 193
193 -
 194
194 -
195
-
196
-
197
-
198
-
199
-
200
-
201
-
202
-
203
-
204
-
205
-
206
-
207
-
208
-
209
-
210
-
211
-
212
-
213
-
214
-
215
-
216
-
217
-
218
-
219
-
220
-
221
-
222
-
223
-
224
-
225
-
226
-
227
-
228
-
229
-
230
-
231
-
232
-
233
-
234
-
235
-
236
-
237
-
238
-
239
-
240
-
241
-
242
-
243
-
244
-
245
-
246
-
247
-
248
-
249
-
250
-
251
-
252
-
253
-
254
-
255
-
256
-
257
-
258
-
259
-
260
-
261
-
262
-
263
-
264
-
265
-
266
-
267
-
268
-
269
-
270
-
271
-
272
-
273
-
274
-
275
-
276
-
277
-
278
-
279
-
280
-
281
-
282
-
283
-
284
-
285
-
286
-
287
-
288
-
289
-
290
-
291
-
292
-
293
-
294
-
295
-
296
-
297
-
298
-
299
-
300
-
301
-
302
-
303
-
304
-
305
-
306
-
307
-
308
-
309
-
310
-
311
-
312
-
313
-
314
-
315
-
316
-
317
-
318
 |
 |