HP LaserJet M5000 HP Embedded Web Server - User Guide - Page 47
Security, Settings, Digital Sending, Networking, New Password, Verify Password, Apply, Print
 |
View all HP LaserJet M5000 manuals
Add to My Manuals
Save this manual to your list of manuals |
Page 47 highlights
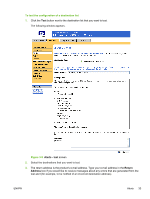
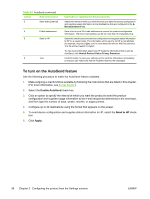
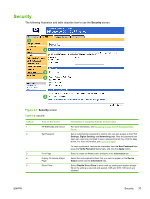
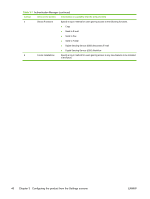
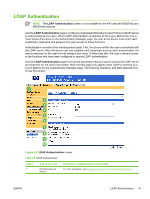
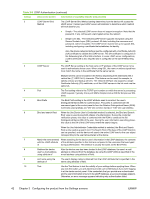
Security The following illustration and table describe how to use the Security screen. Figure 3-7 Security screen Table 3-6 Security Callout 1 Area on the screen HP EWS tabs and menus 2 Set Password 3 Print Page 4 Display On Device Status Page 5 Direct Ports Information or capability that the area provides For more information, see Navigating through the HP Embedded Web Server. Set an administrator password to control who can gain access to the EWS Settings, Digital Sending, and Networking tabs. After the password has been set, users are prompted to type a password when they click the Log In link. For more information, see Login and logoff. To clear a password, remove the characters from the New Password field, leave the Verify Password field empty, and click the Apply button. Select to make the Print screen available in the Information tab. Select the control-panel buttons that you want to appear on the Device Status screen (on the Information tab). Select Disable Direct Ports to block walk-up printing and system access. When the setting is selected and applied, USB and IEEE 1284 ports are disabled. ENWW Security 37
-
 1
1 -
2
-
3
-
4
-
5
-
6
-
7
-
8
-
9
-
10
-
11
-
12
-
13
-
14
-
15
-
16
-
17
-
18
-
19
-
20
-
21
-
22
-
23
-
24
-
25
-
26
-
27
-
28
-
29
-
30
-
31
-
32
-
33
-
34
-
35
-
36
-
37
-
38
-
39
-
40
-
41
-
 42
42 -
 43
43 -
 44
44 -
 45
45 -
 46
46 -
 47
47 -
 48
48 -
 49
49 -
 50
50 -
 51
51 -
 52
52 -
53
-
54
-
55
-
56
-
57
-
58
-
59
-
60
-
61
-
62
-
63
-
64
-
65
-
66
-
67
-
68
-
69
-
70
-
71
-
72
-
73
-
74
-
75
-
76
-
77
-
78
-
79
-
80
-
81
-
82
-
83
-
84
-
85
-
86
-
87
-
88
-
89
-
90
-
91
-
92
-
93
-
94
-
95
-
96
-
97
-
98
-
99
-
100
-
101
-
102
 |
 |
