HP LaserJet P1500 HP LaserJet P1000 and P1500 Series - Software Technical Refe - Page 123
Installation instructions for networked computers (network-ready models only) - mac
 |
View all HP LaserJet P1500 manuals
Add to My Manuals
Save this manual to your list of manuals |
Page 123 highlights
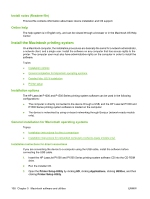
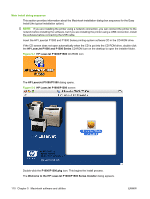
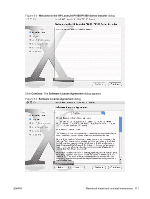
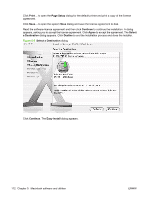
4. Verify that the device has been set up automatically. If the HP LaserJet P1000 or P1500 Series printer appears in the list of printers, go to step 9. If the HP LaserJet P1000 or P1500 Series printer does not appear in the list of printers, go to step 5. 5. In the Printer Setup Utility, click Add. 6. In the Printer List box, click USB. 7. In the Printer Model box, click either HP LaserJet P1000 printer or HP LaserJet P1500 printer, and then click Add. 8. In the Printer Setup Utility, either HP LaserJet P1000 printer or HP LaserJet P1500 printer, and then click Make Default. 9. Print a page from any program to make sure that the software is correctly installed. Installation instructions for networked computers (network-ready models only) If you are connecting the device to a network, connect the network cable to the printer network port (network-ready models only). 1. Some models of the HP LaserJet P1500 Series printers have on-board networking available for network connection. For a 10/100 Base-T network, connect a twisted-pair network cable between the device and an active network port. 2. Print a Configuration Report page. 3. For the OS X Bonjour feature, locate the mDNS Name under the Network Setting heading on the Configuration Report page. NOTE: 'Bonjour' is found in Mac OS v10.4.3 and above. Mac OS v10.3.9 referred to the same technology as 'Rendezvous'. 4. Insert the Macintosh printing-system software CD into the CD-ROM drive. 5. Run the installer CD. 6. Open the Printer Setup Utility by clicking the icon at the bottom of the screen, or by clicking HD, clicking Applications, clicking Utilities, and then clicking Printer Setup Utility. 7. Click Add, and choose Bonjour from the drop-down list. Then find and click the mDNS name for the device, and then click Add. 8. Print a page from any program to make sure that the software is correctly installed NOTE: If the installation fails, reinstall the software. If the reinstallation fails, see the Hewlett-Packard LaserJet P1000 / P1500 Series Install Notes on the HP LaserJet P1000 and P1500 Series printingsystem software CD, see the flyer that came in the box with the device, or go to one of the following Web sites for help or more information: www.hp.com/support/ljP1000 or www.hp.com/support/ljP1500 Detailed Mac OS X installation Topics: ● Main Install dialog sequence ENWW Macintosh install and uninstall instructions 109
-
 1
1 -
2
-
3
-
4
-
5
-
6
-
7
-
8
-
9
-
10
-
11
-
12
-
13
-
14
-
15
-
16
-
17
-
18
-
19
-
20
-
21
-
22
-
23
-
24
-
25
-
26
-
27
-
28
-
29
-
30
-
31
-
32
-
33
-
34
-
35
-
36
-
37
-
38
-
39
-
40
-
41
-
42
-
43
-
44
-
45
-
46
-
47
-
48
-
49
-
50
-
51
-
52
-
53
-
54
-
55
-
56
-
57
-
58
-
59
-
60
-
61
-
62
-
63
-
64
-
65
-
66
-
67
-
68
-
69
-
70
-
71
-
72
-
73
-
74
-
75
-
76
-
77
-
78
-
79
-
80
-
81
-
82
-
83
-
84
-
85
-
86
-
87
-
88
-
89
-
90
-
91
-
92
-
93
-
94
-
95
-
96
-
97
-
98
-
99
-
100
-
101
-
102
-
103
-
104
-
105
-
106
-
107
-
108
-
109
-
110
-
111
-
112
-
113
-
114
-
115
-
116
-
117
-
 118
118 -
 119
119 -
 120
120 -
 121
121 -
 122
122 -
 123
123 -
 124
124 -
 125
125 -
 126
126 -
 127
127 -
 128
128 -
129
-
130
-
131
-
132
-
133
-
134
-
135
-
136
-
137
-
138
-
139
-
140
-
141
-
142
-
143
-
144
-
145
-
146
-
147
-
148
-
149
-
150
-
151
-
152
-
153
-
154
 |
 |