HP M1522n HP LaserJet M1522 MFP Series User Guide - Page 178
Problem solve, Load Tray 1 <TYPE> <SIZE>, Press OK - install black cartridge
 |
UPC - 883585238460
View all HP M1522n manuals
Add to My Manuals
Save this manual to your list of manuals |
Page 178 highlights
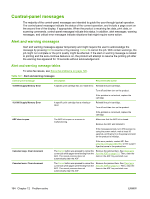
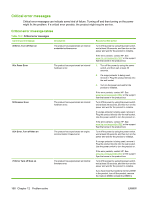
Table 12-1 Alert and warning messages (continued) Control panel message Description Recommended action Fit to Page on flatbed only The copy reduce/enlarge feature (called "Fit Use the flatbed or select another reduction/ to Page") applies only to copies made from enlargement setting. the flatbed scanner. Install black cartridge No cartridge installed with door closed. Install print cartridge. Invalid driver Press OK You are using the incorrect printer driver. Select the printer driver that is appropriate for your product. Invalid entry Invalid data or response. Correct the entry. Jam in (area), Open door and clear jam Paper jam in one of the following areas: drum area, fuser area, duplex feeding area, duplex receiving area, and duplex pickup area. Clear the jam from the area indicated on the product control panel, and then follow the control panel instructions. See Clear jams on page 170. Jam in Tray #, Clear jam and then press OK The product has detected a jam in an input tray. Clear the jam from the area indicated on the product control panel, and then follow the control panel instructions. See Clear jams on page 170. Load paper Out of paper in all available trays. Load paper in trays. Load Tray # , Press OK to Device is processing job, but a matching tray Press OK to use existing available media. use available media is empty. Load tray #, Press OK Manual duplex mode. "#" is the tray number Load paper in the correct tray. where the first half of the job printed. Load Tray 1 , Press OK to Device is processing job, but no trays match. Press OK to use existing tray settings. use available media Load Tray 1, / Cleaning Cleaning mode paper prompt. mode, OK to start Press OK to begin the cleaning procedures. Manual feed , Press OK to Print Manual Feed mode. use available media Load paper into the priority input tray. Mem. low 1 copy. Press OK The product completed making one copy. The remaining copies have been canceled because of low memory. Press Cancel to clear the error. Break the job into smaller jobs that contain fewer pages. Memory is low Try again later The product does not have enough memory Wait until the current job is finished before to start a new job. starting a new job. Memory is low. Press OK The product memory has been almost completely filled. Allow the product to finish the job, or press Setup to cancel the job. Memory low Only 1 copy made The product does not have enough memory Break the job into smaller jobs that contain to complete the collated copy job. fewer pages. Misprint, Press OK Feed delay misprint. Reload paper. No paper pickup, Press OK The product has failed to pick up a piece of media. Verify that the media was inserted far enough into the input tray. In tray 1, verify that the paper-length guide is in the correct position for the media size that you are using. Reload the media in the input tray and press Setup to continue the job. If the error persists, contact HP. See www.hp.com/support/ljm1522 or the support flyer that came in the product box. 166 Chapter 12 Problem solve ENWW
-
 1
1 -
2
-
3
-
4
-
5
-
6
-
7
-
8
-
9
-
10
-
11
-
12
-
13
-
14
-
15
-
16
-
17
-
18
-
19
-
20
-
21
-
22
-
23
-
24
-
25
-
26
-
27
-
28
-
29
-
30
-
31
-
32
-
33
-
34
-
35
-
36
-
37
-
38
-
39
-
40
-
41
-
42
-
43
-
44
-
45
-
46
-
47
-
48
-
49
-
50
-
51
-
52
-
53
-
54
-
55
-
56
-
57
-
58
-
59
-
60
-
61
-
62
-
63
-
64
-
65
-
66
-
67
-
68
-
69
-
70
-
71
-
72
-
73
-
74
-
75
-
76
-
77
-
78
-
79
-
80
-
81
-
82
-
83
-
84
-
85
-
86
-
87
-
88
-
89
-
90
-
91
-
92
-
93
-
94
-
95
-
96
-
97
-
98
-
99
-
100
-
101
-
102
-
103
-
104
-
105
-
106
-
107
-
108
-
109
-
110
-
111
-
112
-
113
-
114
-
115
-
116
-
117
-
118
-
119
-
120
-
121
-
122
-
123
-
124
-
125
-
126
-
127
-
128
-
129
-
130
-
131
-
132
-
133
-
134
-
135
-
136
-
137
-
138
-
139
-
140
-
141
-
142
-
143
-
144
-
145
-
146
-
147
-
148
-
149
-
150
-
151
-
152
-
153
-
154
-
155
-
156
-
157
-
158
-
159
-
160
-
161
-
162
-
163
-
164
-
165
-
166
-
167
-
168
-
169
-
170
-
171
-
172
-
 173
173 -
 174
174 -
 175
175 -
 176
176 -
 177
177 -
 178
178 -
 179
179 -
 180
180 -
 181
181 -
 182
182 -
 183
183 -
184
-
185
-
186
-
187
-
188
-
189
-
190
-
191
-
192
-
193
-
194
-
195
-
196
-
197
-
198
-
199
-
200
-
201
-
202
-
203
-
204
-
205
-
206
-
207
-
208
-
209
-
210
-
211
-
212
-
213
-
214
-
215
-
216
-
217
-
218
-
219
-
220
-
221
-
222
-
223
-
224
-
225
-
226
-
227
-
228
-
229
-
230
-
231
-
232
-
233
-
234
-
235
-
236
-
237
-
238
-
239
-
240
-
241
-
242
-
243
-
244
-
245
-
246
-
247
-
248
-
249
-
250
-
251
-
252
-
253
-
254
 |
 |
