HP M3035 Service Manual - Page 218
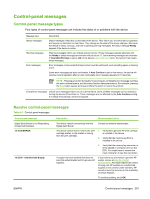
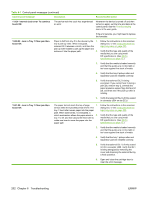
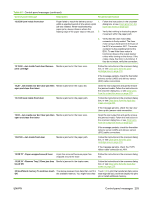
Control panel message, Description, Recommended action, Control-panel messages continued - initializing scanner
 |
UPC - 883585038466
View all HP M3035 manuals
Add to My Manuals
Save this manual to your list of manuals |
Page 218 highlights
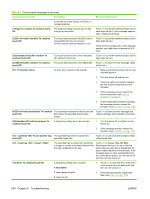
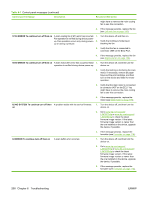
Table 6-1 Control-panel messages (continued) Control panel message Description Recommended action 50.X FUSER ERROR To continue turn off A fuser error has occurred. then on X description 1 low fuser temperature 1. Turn the device off, and then turn the device on. 2. If the message persists, turn off the device to allow the fuser to cool. 2 fuser warmup service 3 fuser over-temperature 4 faulty fuser 5 incorrect fuser is installed 6 open fuser circuit 3. Verify that the correct model fuser is installed in the device. 4. Check the cable connections between the ECU and the fuser. 5. If, after checking the cables, the message persists, replace the fuser (see Fuser on page 139). 6. If, after replacing the fuser, the message persists, replace the ECU (see Engine control unit (ECU) on page 131). 7. If, after replacing the ECU, the message persists, replace the high-voltage power-supply (see High-voltage power supply (HVPS) on page 149). 51.XY ERROR To continue turn off then on A temporary printing error has occurred. 1. Turn the device off, and then turn the device on. 2. Check the cable connections between the laser/scanner and the ECU. 3. If, after checking the cables, the message persists, replace the laser/ scanner (see Laser/scanner on page 142). 4. If, after replacing the laser/scanner, the message persists, replace the ECU (see Engine control unit (ECU) on page 131). 52.00 ERROR A laser/scanner motor error has occurred. 1. Laser/scanner motor rotation is verified at the initialization of a print job. Verify that the laser/scanner motor connector and the ribbon cable from the ECU are firmly seated on the laser/ scanner assembly. 2. Verify that the laser/scanner motor connector is firmly seated in connector J402 on the ECU. You might have to remove the main cooling fan to see this connection. 3. Verify that the ribbon cable installed in connector J403 on the ECU is fully seated. You must remove the ECU in order to verify this connection. 4. If, after checking the cables, the message persists, replace the laser/ scanner (see Laser/scanner on page 142). 5. If, after replacing the laser/scanner, the message persists, replace the ECU 206 Chapter 6 Troubleshooting ENWW
-
 1
1 -
2
-
3
-
4
-
5
-
6
-
7
-
8
-
9
-
10
-
11
-
12
-
13
-
14
-
15
-
16
-
17
-
18
-
19
-
20
-
21
-
22
-
23
-
24
-
25
-
26
-
27
-
28
-
29
-
30
-
31
-
32
-
33
-
34
-
35
-
36
-
37
-
38
-
39
-
40
-
41
-
42
-
43
-
44
-
45
-
46
-
47
-
48
-
49
-
50
-
51
-
52
-
53
-
54
-
55
-
56
-
57
-
58
-
59
-
60
-
61
-
62
-
63
-
64
-
65
-
66
-
67
-
68
-
69
-
70
-
71
-
72
-
73
-
74
-
75
-
76
-
77
-
78
-
79
-
80
-
81
-
82
-
83
-
84
-
85
-
86
-
87
-
88
-
89
-
90
-
91
-
92
-
93
-
94
-
95
-
96
-
97
-
98
-
99
-
100
-
101
-
102
-
103
-
104
-
105
-
106
-
107
-
108
-
109
-
110
-
111
-
112
-
113
-
114
-
115
-
116
-
117
-
118
-
119
-
120
-
121
-
122
-
123
-
124
-
125
-
126
-
127
-
128
-
129
-
130
-
131
-
132
-
133
-
134
-
135
-
136
-
137
-
138
-
139
-
140
-
141
-
142
-
143
-
144
-
145
-
146
-
147
-
148
-
149
-
150
-
151
-
152
-
153
-
154
-
155
-
156
-
157
-
158
-
159
-
160
-
161
-
162
-
163
-
164
-
165
-
166
-
167
-
168
-
169
-
170
-
171
-
172
-
173
-
174
-
175
-
176
-
177
-
178
-
179
-
180
-
181
-
182
-
183
-
184
-
185
-
186
-
187
-
188
-
189
-
190
-
191
-
192
-
193
-
194
-
195
-
196
-
197
-
198
-
199
-
200
-
201
-
202
-
203
-
204
-
205
-
206
-
207
-
208
-
209
-
210
-
211
-
212
-
 213
213 -
 214
214 -
 215
215 -
 216
216 -
 217
217 -
 218
218 -
 219
219 -
 220
220 -
 221
221 -
 222
222 -
 223
223 -
224
-
225
-
226
-
227
-
228
-
229
-
230
-
231
-
232
-
233
-
234
-
235
-
236
-
237
-
238
-
239
-
240
-
241
-
242
-
243
-
244
-
245
-
246
-
247
-
248
-
249
-
250
-
251
-
252
-
253
-
254
-
255
-
256
-
257
-
258
-
259
-
260
-
261
-
262
-
263
-
264
-
265
-
266
-
267
-
268
-
269
-
270
-
271
-
272
-
273
-
274
-
275
-
276
-
277
-
278
-
279
-
280
-
281
-
282
-
283
-
284
-
285
-
286
-
287
-
288
-
289
-
290
-
291
-
292
-
293
-
294
-
295
-
296
-
297
-
298
-
299
-
300
-
301
-
302
-
303
-
304
-
305
-
306
-
307
-
308
-
309
-
310
-
311
-
312
-
313
-
314
-
315
-
316
-
317
-
318
-
319
-
320
-
321
-
322
-
323
-
324
-
325
-
326
-
327
-
328
-
329
-
330
-
331
-
332
-
333
-
334
-
335
-
336
-
337
-
338
-
339
-
340
-
341
-
342
-
343
-
344
-
345
-
346
-
347
-
348
-
349
-
350
-
351
-
352
-
353
-
354
-
355
-
356
-
357
-
358
-
359
-
360
-
361
-
362
-
363
-
364
-
365
-
366
-
367
-
368
 |
 |
