HP Media Center m1200 Upgrading and Servicing Guide - Page 8
Removing and, Replacing Drives
 |
View all HP Media Center m1200 manuals
Add to My Manuals
Save this manual to your list of manuals |
Page 8 highlights
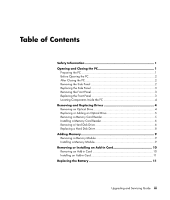
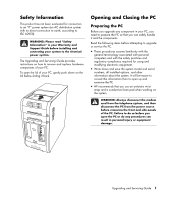
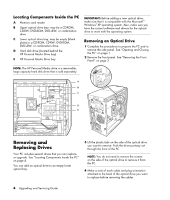
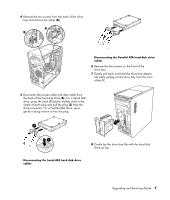
Locating Components Inside the PC A Memory card reader B Upper optical drive bay, may be a CD-ROM, CD-RW, DVD-ROM, DVD+RW, or combination drive C Lower optical drive bay, may be empty (blank plate) or a CD-ROM, CD-RW, DVD-ROM, DVD+RW, or combination drive D Hard disk drive (located behind the HP Personal Media Drive bay) E HP Personal Media Drive bay IMPORTANT: Before adding a new optical drive, make sure that it is compatible with the Microsoft ® Windows® XP operating system. Also, make sure you have the correct software and drivers for the optical drive to work with the operating system. Removing an Optical Drive 1 Complete the procedures to prepare the PC and to remove the side panel. See "Opening and Closing the PC" on page 1. 2 Remove the front panel. See "Removing the Front Panel" on page 3. NOTE: The HP Personal Media drive is a removable, large capacity hard disk drive that is sold separately. A B C D E Removing and Replacing Drives Your PC includes several drives that you can replace or upgrade. See "Locating Components Inside the PC" on page 4. You can add an optical drive to an empty lower optical bay. 3 Lift the plastic tabs on the side of the optical drive you want to remove. Push the drive partway out through the front of the PC. NOTE: You do not need to remove the screws on the side of the optical drive to remove it from the PC. 4 Make a note of each cable and plug orientation attached to the back of the optical drive you want to replace before removing the cables. 4 Upgrading and Servicing Guide
-
 1
1 -
2
-
 3
3 -
 4
4 -
 5
5 -
 6
6 -
 7
7 -
 8
8 -
 9
9 -
 10
10 -
 11
11 -
 12
12 -
 13
13 -
14
-
15
-
16
 |
 |