HP Microportable Projector MP1800 Compaq Microportable Projectors & the Ar - Page 3
I have a complete image, but it is smaller than what I have seen before.
 |
View all HP Microportable Projector MP1800 manuals
Add to My Manuals
Save this manual to your list of manuals |
Page 3 highlights
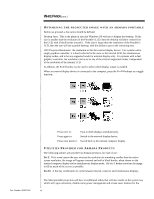
Doc Number 20AT1020 WHITE PAPER (cont.) ... RECOMMENDATIONS The Microportable projector's native resolutions are 800*600 (SVGA) and 1024*768 (XGA) based on the model. Driving the projector at this resolution will provide optimal viewing experience, as the image is mapped, pixel-by-pixel from the computer to the internal electronics. Thus, the user should attempt to always drive the projectors at their native resolutions. When a different resolution is used, the projector will automatically scale up or scale down the image to fit into the internal array. That means that some interpolation of data will be necessary, and though the circuitry provided is state-of-the-art, it will never be as perfect as the case where no pixels are modified, added or removed. If the chosen resolution is beyond the range of the projector, a warning message will be displayed. There are applications that will only run at fixed resolutions. Should it be other than SVGA or XGA, then the next best thing is to let the projector do the scaling. The expansion capabilities of many older Armada portable products are not as advanced as that of the Microportable projectors. COMMON PROBLEMS SETTING-UP THE PORTABLE & PROJECTOR When using a portable with Dual Display capability, it is possible for the user to encounter some display modes that are not desired. The image on the projector is only a partial image, and I can pan around it. What happened here is that the user set the external display to a smaller resolution using the "overhead projector" icon (or via the display settings utility) without making the desktop area smaller. Thus, Microsoft Windows "thinks" the user wants a full 1024*768 desktop area to present information, and that at the same time he only wants a smaller area to be visible on the external display device. This can easily be corrected by adjusting the "desktop area" to match the "CRT resolution". In this case, the complete desktop area will be visible on the external display device. I have a complete image, but it is smaller than what I have seen before. What most likely happened is that the user (or application) set the system to a lower resolution (games do this quite a bit), and then the projector utility set to simultaneous display of this lower resolution. Then, the black border seen around the internal LCD is also seen on the external display device, making the overall visible image smaller than normal. There are two ways to fix this: The user can either press Fn-F4 to cycle to an external display viewing only (internal LCD blanks), at which the system will automatically drive the projector at full screen, or the user can set the external device to the smaller resolution using the "overhead projector" icon on the system tray. If the user is currently showing the image on the internal computer display, then Fn-F4 will need to be pressed twice in order to switch to the external display device. The user can also simply increase the resolution of the external display device, via the "display properties" tabs that Microsoft Windows provides. The level of flexibility on these adjustments will be determined by the graphics controller used: single or dual display. Video (DVD or other) is only seen on one display device. Although some Armada portables have a Dual Graphics Controller, they still have a single video processing unit. Thus, while on Dual Display mode, video can only be shown on one display device (selectable via the advanced settings tabs). If the user desires to view video on both display devices, the Armada portable must be set in simultaneous display mode, single controller configuration (resolution must match the internal LCD, and refresh rate must be 60Hz). 3
-
 1
1 -
 2
2 -
 3
3 -
 4
4 -
 5
5 -
 6
6 -
 7
7 -
 8
8 -
 9
9
 |
 |
