HP NetServer LP 2000r Installing Microsoft Small Business Server 2000 on an HP - Page 7
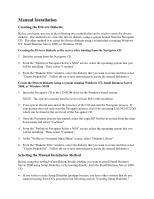
you have the HP NetRAID-4M, select Hewlett Packard NetRAID-4M RAID
 |
View all HP NetServer LP 2000r manuals
Add to My Manuals
Save this manual to your list of manuals |
Page 7 highlights
NOTE: If the boot device driver is not included on the Small Business Server 2000 CDROM, for example the "HP NetRAID-4M", then do the following steps after pressing F6 a) Press S to select additional hardware. b) Select Other and press Enter. c) When prompted to insert driver diskette, please insert the target adapter driver's diskette created with the HP Navigator CD-ROM. Press Enter to continue. d) Select the target device driver from the list provided on the display. For example, if you have the "HP NetRAID-4M", select "Hewlett Packard NetRAID-4M RAID CONTROLLER". e) If you have no other drivers that you need to install, press Enter to continue with the installation. 3. Press Enter to continue at the "Small Business Server 2000 Server Setup. Setup Notification..." screen. 4. Press Enter to continue at the "Small Business Server 2000 Server Setup. Welcome to Setup..." screen. 5. Press C to continue Setup at the "Setup has determined that your computer's startup hard disk is new..." prompt. 6. Press F8 to accept the licensing agreement. 7. At the drives partitioning screen, select the target drive. If you want to use the entire drive to install Small Business Server 2000 then press Enter. Otherwise, press C to create a drive a partition. (In this example we will create a 2GB partition. Please note that Small Business Server 2000 does not have the 2GB partition size limitation present on NT 4.0.) 8. Type 2048 and press Enter at the Create partition size prompt. 9. HP recommends that you create all the partitions needed for each hard drive present on your system at this time. 10. Select the target drive to be used to install Small Business Server 2000. Press Enter. 11. Select Format the partition using the NTFS file system and press Enter. 12. The installer will format and copy files to the hard drive. The system will then reboot. 13. Click Next to continue at the Setup Wizard first dialog box. 14. The Installing Devices screen will be shown with a progress bar on the display. This may take 10 to 15 minutes.
-
 1
1 -
 2
2 -
 3
3 -
 4
4 -
 5
5 -
 6
6 -
 7
7 -
 8
8 -
 9
9 -
 10
10 -
 11
11 -
 12
12 -
13
-
14
-
15
-
16
-
17
-
18
-
19
-
20
-
21
-
22
 |
 |