HP OMEN 15-dc2000 Maintenance and Service Guide - Page 72
Display assembly
 |
View all HP OMEN 15-dc2000 manuals
Add to My Manuals
Save this manual to your list of manuals |
Page 72 highlights
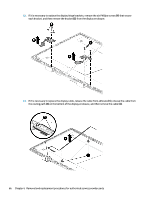
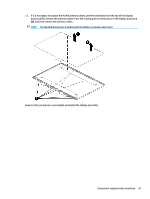
Display assembly NOTE: Display assemblies have spare parts only at the subcomponent level. Additional display assembly spare part information is available at Display assembly subcomponents on page 26. Before removing the display assembly, follow these steps: 1. Prepare the computer for disassembly (Preparation for disassembly on page 34). 2. Remove the base enclosure (see Base enclosure on page 34). 3. Remove the battery (see Battery on page 45). 4. Remove the hard drive (see Hard drive (HDD) on page 37). 5. Remove the solid-state drive (see Solid-state drive (SSD) on page 39). 6. Remove the power connector cable (see Power connector cable on page 50). 7. Remove the fans (see Fans on page 48). 8. Remove the system board (see System board on page 53). Remove the display assembly: 1. Remove the three Phillips M2.5 × 5.0 screws (1) from the display cable brackets. 2. Position the display hinges (2) up. 3. Remove the antenna cables from the clips built into the computer (3). 4. Lift the display assembly (4) straight up and remove it. CAUTION: When installing the display assembly, be sure that the wireless antenna cables are routed and arranged properly. Failure to properly route the antennas can result in degradation of the computer's wireless performance. 62 Chapter 6 Removal and replacement procedures for authorized service provider parts
-
 1
1 -
2
-
3
-
4
-
5
-
6
-
7
-
8
-
9
-
10
-
11
-
12
-
13
-
14
-
15
-
16
-
17
-
18
-
19
-
20
-
21
-
22
-
23
-
24
-
25
-
26
-
27
-
28
-
29
-
30
-
31
-
32
-
33
-
34
-
35
-
36
-
37
-
38
-
39
-
40
-
41
-
42
-
43
-
44
-
45
-
46
-
47
-
48
-
49
-
50
-
51
-
52
-
53
-
54
-
55
-
56
-
57
-
58
-
59
-
60
-
61
-
62
-
63
-
64
-
65
-
66
-
 67
67 -
 68
68 -
 69
69 -
 70
70 -
 71
71 -
 72
72 -
 73
73 -
 74
74 -
 75
75 -
 76
76 -
 77
77 -
78
-
79
-
80
-
81
-
82
-
83
-
84
-
85
-
86
-
87
-
88
-
89
-
90
-
91
-
92
-
93
-
94
-
95
 |
 |
