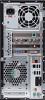
HP Pavilion a6000 Getting Started Guide - Page 107
Using the Drive, Transferring files to another computer manually
 |
View all HP Pavilion a6000 manuals
Add to My Manuals
Save this manual to your list of manuals |
Page 107 highlights
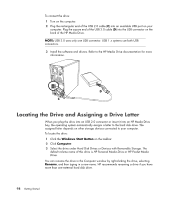
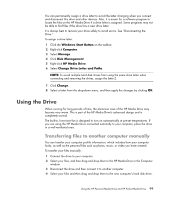
You can permanently assign a drive letter to avoid the letter changing when you connect and disconnect this drive and other devices. Also, it is easier for a software program to locate the files on the HP Media Drive if a drive letter is assigned. Some programs may not be able to find files if the drive has a new drive letter. It is always best to remove your drive safely to avoid errors. See "Disconnecting the Drive." To assign a drive letter: 1 Click the Windows Start Button on the taskbar. 2 Right-click Computer. 3 Select Manage. 4 Click Disk Management. 5 Right-click HP Media Drive. 6 Select Change Drive Letter and Paths. NOTE: To avoid multiple hard disk drives from using the same drive letter when connecting and removing the drives, assign the letter Z. 7 Click Change. 8 Select a letter from the drop-down menu, and then apply the changes by clicking OK. Using the Drive When running for long periods of time, the aluminum case of the HP Media Drive may become very warm. This is part of the HP Media Drive's advanced design and is completely normal. The built-in, low-noise fan is designed to turn on automatically at pre-set temperatures. If you are using the HP Media Drive connected externally to your computer, place the drive in a well-ventilated area. Transferring files to another computer manually You can transfer your computer profile information, which includes how your computer looks, as well as the personal files such as photos, music, or video you have created. To transfer your files manually: 1 Connect the drive to your computer. 2 Select your files, and then drag and drop them to the HP Media Drive in the Computer window. 3 Disconnect the drive and then connect it to another computer. 4 Select your files and then drag and drop them to the new computer's hard disk drive. Using the HP Personal Media Drive and HP Pocket Media Drive 99
-
 1
1 -
2
-
3
-
4
-
5
-
6
-
7
-
8
-
9
-
10
-
11
-
12
-
13
-
14
-
15
-
16
-
17
-
18
-
19
-
20
-
21
-
22
-
23
-
24
-
25
-
26
-
27
-
28
-
29
-
30
-
31
-
32
-
33
-
34
-
35
-
36
-
37
-
38
-
39
-
40
-
41
-
42
-
43
-
44
-
45
-
46
-
47
-
48
-
49
-
50
-
51
-
52
-
53
-
54
-
55
-
56
-
57
-
58
-
59
-
60
-
61
-
62
-
63
-
64
-
65
-
66
-
67
-
68
-
69
-
70
-
71
-
72
-
73
-
74
-
75
-
76
-
77
-
78
-
79
-
80
-
81
-
82
-
83
-
84
-
85
-
86
-
87
-
88
-
89
-
90
-
91
-
92
-
93
-
94
-
95
-
96
-
97
-
98
-
99
-
100
-
101
-
 102
102 -
 103
103 -
 104
104 -
 105
105 -
 106
106 -
 107
107 -
 108
108 -
 109
109 -
 110
110 -
 111
111 -
 112
112 -
113
-
114
-
115
-
116
-
117
-
118
-
119
-
120
-
121
-
122
-
123
-
124
-
125
-
126
-
127
-
128
-
129
-
130
-
131
-
132
-
133
-
134
-
135
-
136
-
137
-
138
-
139
-
140
 |
 |