HP Pavilion t300 HP Pavilion Desktop PCs - (English) Users Guide 5990-6416 - Page 144
Chassis I and Chassis II only
 |
View all HP Pavilion t300 manuals
Add to My Manuals
Save this manual to your list of manuals |
Page 144 highlights
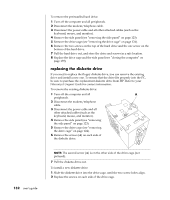
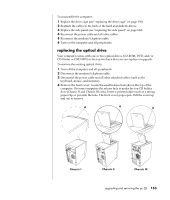
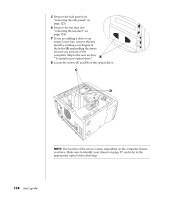
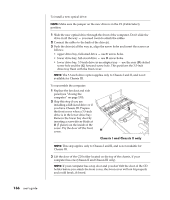
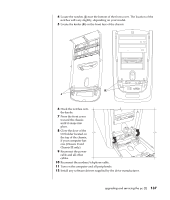
To install a new optical drive: NOTE: Make sure the jumper on the new drive is in the CS (Cable Select) position. 1 Slide the new optical drive through the front of the computer. Don't slide the drive in all the way - you need room to attach the cables. 2 Connect the cables to the back of the drive(s). 3 Push the drive(s) all the way in, align the screw holes and insert the screws as follows: • upper drive bay, full-sized drive - use C screw holes. • lower drive bay, full-sized drive - use D screw holes. • lower drive bay, 3.5-inch drive in an adapter tray - use the rear (D) slotted screw hole and the (G) forward screw hole. This positions the 3.5-inch drive tray flush with the front cover. NOTE: The 3.5-inch drive option applies only to Chassis I and II, and is not available for Chassis III. To reassemble the computer: 1 Replace the fan duct and side panel (see "closing the computer" on page 139). 2 Skip this step if you are installing a full-sized drive or if you have Chassis III. Prepare the front cover when a 3.5-inch drive is in the lower drive bay: Remove the lower bay door by inserting a screwdriver blade at H (5 places) on the inside of the cover. Pry the door off the front cover. H Chassis I and Chassis II only NOTE: This step applies only to Chassis I and II, and is not available for Chassis III. 3 Lift the door of the CD holder located on the top of the chassis, if your computer has one (Chassis II and Chassis III only). NOTE: If your computer has a top door and you don't lift the door of the CD holder before you attach the front cover, the front cover will not fit properly and could break, if forced. 136 user's guide
-
 1
1 -
2
-
3
-
4
-
5
-
6
-
7
-
8
-
9
-
10
-
11
-
12
-
13
-
14
-
15
-
16
-
17
-
18
-
19
-
20
-
21
-
22
-
23
-
24
-
25
-
26
-
27
-
28
-
29
-
30
-
31
-
32
-
33
-
34
-
35
-
36
-
37
-
38
-
39
-
40
-
41
-
42
-
43
-
44
-
45
-
46
-
47
-
48
-
49
-
50
-
51
-
52
-
53
-
54
-
55
-
56
-
57
-
58
-
59
-
60
-
61
-
62
-
63
-
64
-
65
-
66
-
67
-
68
-
69
-
70
-
71
-
72
-
73
-
74
-
75
-
76
-
77
-
78
-
79
-
80
-
81
-
82
-
83
-
84
-
85
-
86
-
87
-
88
-
89
-
90
-
91
-
92
-
93
-
94
-
95
-
96
-
97
-
98
-
99
-
100
-
101
-
102
-
103
-
104
-
105
-
106
-
107
-
108
-
109
-
110
-
111
-
112
-
113
-
114
-
115
-
116
-
117
-
118
-
119
-
120
-
121
-
122
-
123
-
124
-
125
-
126
-
127
-
128
-
129
-
130
-
131
-
132
-
133
-
134
-
135
-
136
-
137
-
138
-
 139
139 -
 140
140 -
 141
141 -
 142
142 -
 143
143 -
 144
144 -
 145
145 -
 146
146 -
 147
147 -
 148
148 -
 149
149 -
150
-
151
-
152
-
153
-
154
-
155
-
156
 |
 |
