HP Pavilion ze2500 HP Pavilion ze2000 Notebook PC, Compaq Presario M2000 Noteb - Page 131
that secure the display, Remove the four PM2.0×7.0 screws
 |
View all HP Pavilion ze2500 manuals
Add to My Manuals
Save this manual to your list of manuals |
Page 131 highlights
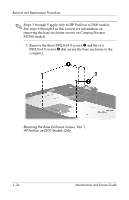
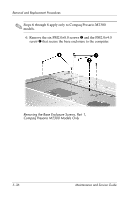
Removal and Replacement Procedures Ä CAUTION: Support the display assembly when removing the following screws. Failure to follow this caution can result in damage to the display assembly. ✎ Steps 9 and 10 apply only to HP Pavilion ze2300 models. See steps 11 and 12 in this section for information on removing the display assembly on Compaq Presario M2300 models. 9. Remove the four PM2.0×7.0 screws 1 that secure the display assembly to the computer. 10. Remove the display assembly 2. Removing the Display Assembly Screws, HP Pavilion ze2300 Models Only Maintenance and Service Guide 5-31
-
 1
1 -
2
-
3
-
4
-
5
-
6
-
7
-
8
-
9
-
10
-
11
-
12
-
13
-
14
-
15
-
16
-
17
-
18
-
19
-
20
-
21
-
22
-
23
-
24
-
25
-
26
-
27
-
28
-
29
-
30
-
31
-
32
-
33
-
34
-
35
-
36
-
37
-
38
-
39
-
40
-
41
-
42
-
43
-
44
-
45
-
46
-
47
-
48
-
49
-
50
-
51
-
52
-
53
-
54
-
55
-
56
-
57
-
58
-
59
-
60
-
61
-
62
-
63
-
64
-
65
-
66
-
67
-
68
-
69
-
70
-
71
-
72
-
73
-
74
-
75
-
76
-
77
-
78
-
79
-
80
-
81
-
82
-
83
-
84
-
85
-
86
-
87
-
88
-
89
-
90
-
91
-
92
-
93
-
94
-
95
-
96
-
97
-
98
-
99
-
100
-
101
-
102
-
103
-
104
-
105
-
106
-
107
-
108
-
109
-
110
-
111
-
112
-
113
-
114
-
115
-
116
-
117
-
118
-
119
-
120
-
121
-
122
-
123
-
124
-
125
-
 126
126 -
 127
127 -
 128
128 -
 129
129 -
 130
130 -
 131
131 -
 132
132 -
 133
133 -
 134
134 -
 135
135 -
 136
136 -
137
-
138
-
139
-
140
-
141
-
142
-
143
-
144
-
145
-
146
-
147
-
148
-
149
-
150
-
151
-
152
-
153
-
154
-
155
-
156
-
157
-
158
-
159
-
160
-
161
-
162
-
163
-
164
-
165
-
166
-
167
-
168
-
169
-
170
-
171
-
172
-
173
-
174
-
175
-
176
-
177
-
178
-
179
-
180
-
181
-
182
-
183
-
184
-
185
-
186
-
187
-
188
-
189
-
190
-
191
-
192
-
193
-
194
-
195
-
196
-
197
-
198
-
199
-
200
-
201
-
202
-
203
-
204
-
205
-
206
-
207
-
208
-
209
-
210
-
211
-
212
-
213
-
214
-
215
-
216
-
217
-
218
-
219
-
220
-
221
-
222
-
223
-
224
-
225
-
226
-
227
-
228
-
229
-
230
-
231
-
232
-
233
-
234
-
235
-
236
-
237
-
238
-
239
 |
 |

Removal and Replacement Procedures
Maintenance and Service Guide
5–31
Ä
CAUTION:
Support the display assembly when removing the following
screws. Failure to follow this caution can result in damage to the
display assembly.
✎
Steps 9 and 10 apply only to HP Pavilion ze2300 models. See
steps 11 and 12 in this section for information on removing the
display assembly on Compaq Presario M2300 models.
9.
Remove the four PM2.0×7.0 screws
1
that secure the display
assembly to the computer.
10. Remove the display assembly
2
.
Removing the Display Assembly Screws,
HP Pavilion ze2300 Models Only