HP Photosmart A520 Basics Guide - Page 5
English: Get started, The HP Photosmart at a glance, Front and rear views - power supply
 |
View all HP Photosmart A520 manuals
Add to My Manuals
Save this manual to your list of manuals |
Page 5 highlights
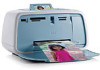
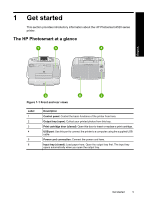
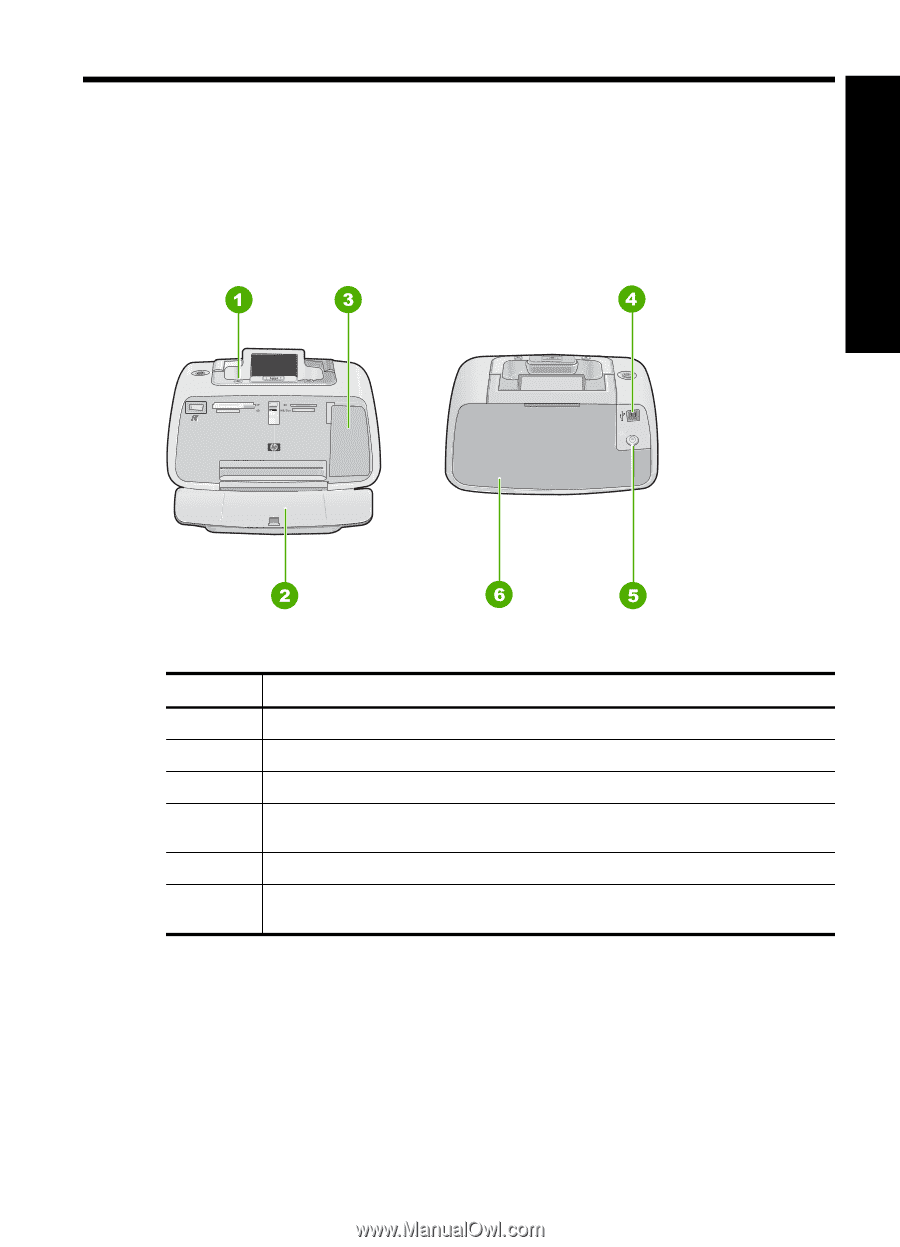
1 Get started This section provides introductory information about the HP Photosmart A520 series printer. The HP Photosmart at a glance English Figure 1-1 Front and rear views Label 1 2 3 4 5 6 Description Control panel: Control the basic functions of the printer from here. Output tray (open): Collect your printed photos from this tray. Print cartridge door (closed): Open this door to insert or replace a print cartridge. USB port: Use this port to connect the printer to a computer using the supplied USB cable. Power cord connection: Connect the power cord here. Input tray (closed): Load paper here. Open the output tray first. The input tray opens automatically when you open the output tray. Get started 5
-
 1
1 -
 2
2 -
 3
3 -
 4
4 -
 5
5 -
 6
6 -
 7
7 -
 8
8 -
 9
9 -
 10
10 -
 11
11 -
12
-
13
-
14
-
15
-
16
-
17
-
18
-
19
-
20
-
21
-
22
-
23
-
24
-
25
-
26
-
27
-
28
-
29
-
30
-
31
-
32
-
33
-
34
-
35
-
36
-
37
-
38
-
39
-
40
-
41
-
42
-
43
-
44
-
45
 |
 |
1
Get started
This section provides introductory information about the HP Photosmart A520 series
printer.
The HP Photosmart at a glance
Figure 1-1 Front and rear views
Label
Description
1
Control panel
: Control the basic functions of the printer from here.
2
Output tray (open)
: Collect your printed photos from this tray.
3
Print cartridge door (closed)
: Open this door to insert or replace a print cartridge.
4
USB port
: Use this port to connect the printer to a computer using the supplied USB
cable.
5
Power cord connection
: Connect the power cord here.
6
Input tray (closed)
: Load paper here. Open the output tray first. The input tray
opens automatically when you open the output tray.
Get started
5
English