HP Photosmart A520 Basics Guide - Page 9
Print a photo, Remove red eye in photos, Connect to a computer, Install the software and connect - troubleshoot
 |
View all HP Photosmart A520 manuals
Add to My Manuals
Save this manual to your list of manuals |
Page 9 highlights
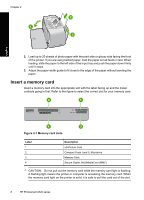
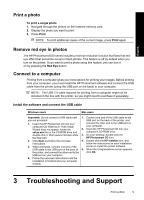
English Print a photo To print a single photo 1. Navigate through the photos on the inserted memory card. 2. Display the photo you want to print. 3. Press Print. NOTE: To print additional copies of the current image, press Print again. Remove red eye in photos The HP Photosmart A520 series includes a red-eye reduction function that fixes that redeye effect that sometime occurs in flash photos. This feature is off by default when you turn on the printer. If you want to print a photo using this feature, you can turn it on by pressing the Red Eye button. Connect to a computer Printing from a computer gives you more options for printing your images. Before printing from your computer, you must install the HP Photosmart software and connect the USB cable from the printer (using the USB port on the back) to your computer. NOTE: The USB 2.0 cable required for printing from a computer might not be included in the box with the printer, so you might need to purchase it separately. Install the software and connect the USB cable Windows users Mac users Important: Do not connect a USB cable until 1. Connect one end of the USB cable to the you are prompted. USB port on the back of the printer, and 1. Insert the HP Photosmart CD into your computer CD-ROM drive. If the Install Wizard does not appear, locate the setup.exe file on the CD-ROM drive and double-click it. Wait several minutes while the files load. connect the other end to the USB port on your computer. 2. Insert the HP Photosmart CD into your computer's CD-ROM drive. 3. On your desktop, double-click the HP Photosmart CD icon. 2. Click Next and follow the onscreen 4. Double-click the HP Installer icon, and instructions. follow the instructions on each installation 3. When prompted, connect one end of the screen to install the printer software. USB cable to the USB port on the back of 5. When the Congratulations screen appears, the printer, and connect the other end to the click OK. USB port on your computer. 4. Follow the onscreen instructions until the installation is finished and your computer restarts. 3 Troubleshooting and Support Print a photo 9
-
 1
1 -
2
-
3
-
 4
4 -
 5
5 -
 6
6 -
 7
7 -
 8
8 -
 9
9 -
 10
10 -
 11
11 -
 12
12 -
 13
13 -
 14
14 -
15
-
16
-
17
-
18
-
19
-
20
-
21
-
22
-
23
-
24
-
25
-
26
-
27
-
28
-
29
-
30
-
31
-
32
-
33
-
34
-
35
-
36
-
37
-
38
-
39
-
40
-
41
-
42
-
43
-
44
-
45
 |
 |