HP Photosmart E200 User's Manual - Page 17
Install the Software, Windows®
 |
View all HP Photosmart E200 manuals
Add to My Manuals
Save this manual to your list of manuals |
Page 17 highlights
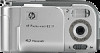
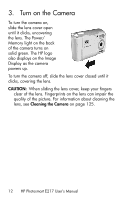
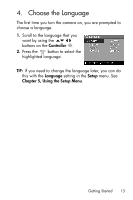
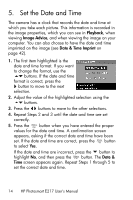
7. Install the Software The HP Image Zone software allows you to transfer images. NOTE: If you do not install the HP Image Zone software, you can still transfer images. For details, see Using Your Camera without Installing the HP Image Zone Software on page 77. NOTE: If you have trouble installing or using the HP Image Zone software, see the HP Customer Support website: www.hp.com/support for more information. Windows® To install the HP Image Zone software successfully, your computer must have a minimum of 64MB of RAM, Windows 2000, XP, 98, 98 SE, or Me, and Internet Explorer 5.5 Service Pack 2 or higher. Internet Explorer 6 is recommended. If your computer meets these requirements, the installation process installs either the full version of HP Image Zone or HP Image Zone Express. For differences between these, see HP Image Zone Software on page 75 and HP Image Zone Express (Windows Only) on page 76. 1. Close all programs and temporarily disable any virus protection software running on your computer. 2. Insert the HP Image Zone software CD into the CD drive of your computer and follow the on-screen instructions. If the installation screen does not appear, click Start, click Run, type D:\Setup.exe, where D is the letter of your CD drive, then click OK. 3. When the HP Image Zone software has finished installing, re-enable the virus protection software you disabled in Step 1. Getting Started 17
-
 1
1 -
2
-
3
-
4
-
5
-
6
-
7
-
8
-
9
-
10
-
11
-
 12
12 -
 13
13 -
 14
14 -
 15
15 -
 16
16 -
 17
17 -
 18
18 -
 19
19 -
 20
20 -
 21
21 -
 22
22 -
23
-
24
-
25
-
26
-
27
-
28
-
29
-
30
-
31
-
32
-
33
-
34
-
35
-
36
-
37
-
38
-
39
-
40
-
41
-
42
-
43
-
44
-
45
-
46
-
47
-
48
-
49
-
50
-
51
-
52
-
53
-
54
-
55
-
56
-
57
-
58
-
59
-
60
-
61
-
62
-
63
-
64
-
65
-
66
-
67
-
68
-
69
-
70
-
71
-
72
-
73
-
74
-
75
-
76
-
77
-
78
-
79
-
80
-
81
-
82
-
83
-
84
-
85
-
86
-
87
-
88
-
89
-
90
-
91
-
92
-
93
-
94
-
95
-
96
-
97
-
98
-
99
-
100
-
101
-
102
-
103
-
104
-
105
-
106
-
107
-
108
-
109
-
110
-
111
-
112
-
113
-
114
-
115
-
116
-
117
-
118
-
119
-
120
-
121
-
122
-
123
-
124
-
125
-
126
-
127
-
128
-
129
-
130
-
131
-
132
-
133
-
134
-
135
-
136
-
137
-
138
 |
 |
