HP Photosmart M437 User Guide - Page 17
Using the Self-Timer setting, Using the Burst setting, Self-Timer, Shutter, Picture Capture - memory
 |
View all HP Photosmart M437 manuals
Add to My Manuals
Save this manual to your list of manuals |
Page 17 highlights
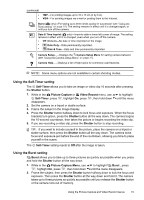
(continued) • • 1MP-For printing images up to 10 x 15 cm (4 by 6 in). VGA-For sending images via e-mail or posting them to the Internet. Burst ( only)-For taking up to three shots quickly in succession (see "Using the Burst setting" on page 15). The setting remains in effect until it is changed again, or until you turn off the camera. Date & Time Imprint ( only)-Imprints date in lower left corner of image. The setting remains in effect until it is changed, even when you turn off the camera. • Off (Default)-No date or time imprinted on the image. • Date Only-Date permanently imprinted. • Date & Time-Date and time permanently imprinted. Camera Setup...-Displays the Camera Setup Menu for setting camera behavior (see "Using the Camera Setup Menu" on page 31). Camera Help...-Displays a list of help topics for commonly used features. NOTE: Some menu options are not available in certain shooting modes. Using the Self-Timer setting The Self-Timer allows you to take an image or video clip 10 seconds after pressing the Shutter button. 1. While in the Picture Capture or Video Record menu, use to highlight Self-Timer, press , highlight On, press , then hold down until the menu disappears. 2. Set the camera on a tripod or stable surface. 3. Frame the subject in the Image Display. 4. Press the Shutter button halfway down to lock focus and exposure. When the focus brackets turn green, press the Shutter button all the way down. The camera begins the 10-second countdown, then takes the picture or begins recording the video clip. 5. If you are recording a video clip, press the Shutter button to stop recording. TIP: If you want to include yourself in the picture, place the camera on a tripod or stable surface, then press the Shutter button all the way down. The camera locks focus and exposure just before the end of the countdown, allowing you time to place yourself in the scene. The Self-Timer setting resets to Off after the image is taken. Using the Burst setting Burst allows you to take up to three pictures as quickly as possible when you press and hold the Shutter button all the way down. 1. While in the Picture Capture Menu, use to highlight Burst , press , highlight On, press , then hold down until the menu disappears. 2. Frame the subject, then press the Shutter button halfway down to lock the focus and exposure. Then press the Shutter button all the way down and hold it. The camera takes up to three pictures as quickly as possible until you release the Shutter button or the camera runs out of memory. Using the Picture Capture and Video Record menus 15
-
 1
1 -
2
-
3
-
4
-
5
-
6
-
7
-
8
-
9
-
10
-
11
-
 12
12 -
 13
13 -
 14
14 -
 15
15 -
 16
16 -
 17
17 -
 18
18 -
 19
19 -
 20
20 -
 21
21 -
 22
22 -
23
-
24
-
25
-
26
-
27
-
28
-
29
-
30
-
31
-
32
-
33
-
34
-
35
-
36
-
37
-
38
-
39
-
40
-
41
-
42
-
43
-
44
-
45
-
46
-
47
-
48
-
49
 |
 |
